~17 min read
Introducing HyperHook: A harnessing framework for Nyx

TL;DR
In this post, we introduce HyperHook, a harnessing framework for snapshot-based fuzzing for user-space applications using Nyx. HyperHook streamlines the process of harnessing a target function, setting up exception handlers, and communicating with the host to retrieve new fuzz inputs.
We’ll explore how HyperHook works, discuss its benefits, and demonstrate its practical application by fuzzing a user-space application using Nyx, HyperHook, and LibAFL for both Windows and Linux targets.
Motivation
Fuzzing is a widely used technique for uncovering bugs in software. However, as applications grow in complexity, fuzzing becomes significantly more challenging, especially when the target has a long startup phase, uses multithreading, or when the target function is difficult to reach. In such cases, snapshot fuzzing provides an effective solution.
This approach involves running the target application up to a certain point, capturing a snapshot of its process state and memory, and restoring it after each run. The fuzzer then injects the fuzz input directly into memory after the snapshot is restored.
When it comes to snapshot fuzzing, the available tools are quite limited. One promising option is Nyx, a full-system snapshot fuzzing tool based on QEMU and KVM. Nyx relies on an agent running inside the guest system to manage both guest-to-host communication and target-specific harnessing.
While experimenting with Nyx for the first time, we realized it would be beneficial to have a framework to abstract and streamline the guest-to-host communication and harnessing. This led us to create HyperHook, a framework designed to simplify and accelerate the process of building agents for new targets, making it easier to set up fuzzing campaigns with Nyx.
Introduction
In this post, we provide a brief overview of snapshot fuzzing, introduce the components we will be using, and walk you through examples of using HyperHook for Windows and Linux user-space targets.
We won’t cover the general background of fuzzing here, as there are numerous excellent resources available online. Instead, we will focus on the technical documentation for using HyperHook in combination with LibAFL and Nyx. If you are just starting with fuzzing, check out the videos or streams by gamozolabs, the Fuzzing Like A Caveman series by h0mbre, or Google’s Fuzzing Forum.
Snapshot fuzzing is a rather advanced technique that differs from conventional (fork mode) fuzzing, where the target-application gets restarted for each test case. Instead, snapshot fuzzing captures a specific program state, including memory, registers, and execution context, allowing the fuzzer to resume execution directly from that point. This eliminates unnecessary initialization steps, significantly reducing overhead and improving efficiency.

Comparison of snapshot fuzzing and fork mode fuzzing
This approach is particularly effective when targeting complex, long-running applications or components that are difficult to reach using traditional input-based fuzzing techniques. By eliminating repetitive initialization steps and focusing on specific program states, snapshot fuzzing enables faster iteration and deeper exploration of execution paths.
To capture and restore snapshots, fuzzers use either emulation or hypervisor-based virtualization. Emulation-based snapshot fuzzing relies on software emulators like QEMU or Unicorn Engine to execute the target program. These tools simulate the underlying hardware, allowing for precise control over the execution state.
Hypervisor-based snapshot fuzzing leverages virtualization technologies like KVM, VMware, Hyper-V, or even custom hypervisors to capture and restore program states. Instead of emulating hardware, hypervisors run the program directly on the host CPU, offering near-native performance.
Emulation-based snapshot fuzzing offers fine-grained control and cross-platform flexibility but often suffers from significant performance overhead. On the other hand, hypervisor-based fuzzing delivers great performance and efficient state management but provides less visibility into program behavior and can be more complex to set up.
We built HyperHook to reduce the overhead and complexity of using Nyx, a hypervisor-based fuzzer.
Fuzzer Implementation
Nyx functions more as a fuzzer backend rather than a complete fuzzer itself. However, it provides a library, libnyx, which allows integration of Nyx into new or existing fuzzers.
For our example setup, we will combine multiple components: Nyx, HyperHook, and LibAFL.
By integrating these components, we can build a fuzzer that utilizes LibAFL for input generation, mutation, and scheduling; Nyx for snapshot management and instrumentation; and HyperHook for target harnessing and guest-to-host communication.
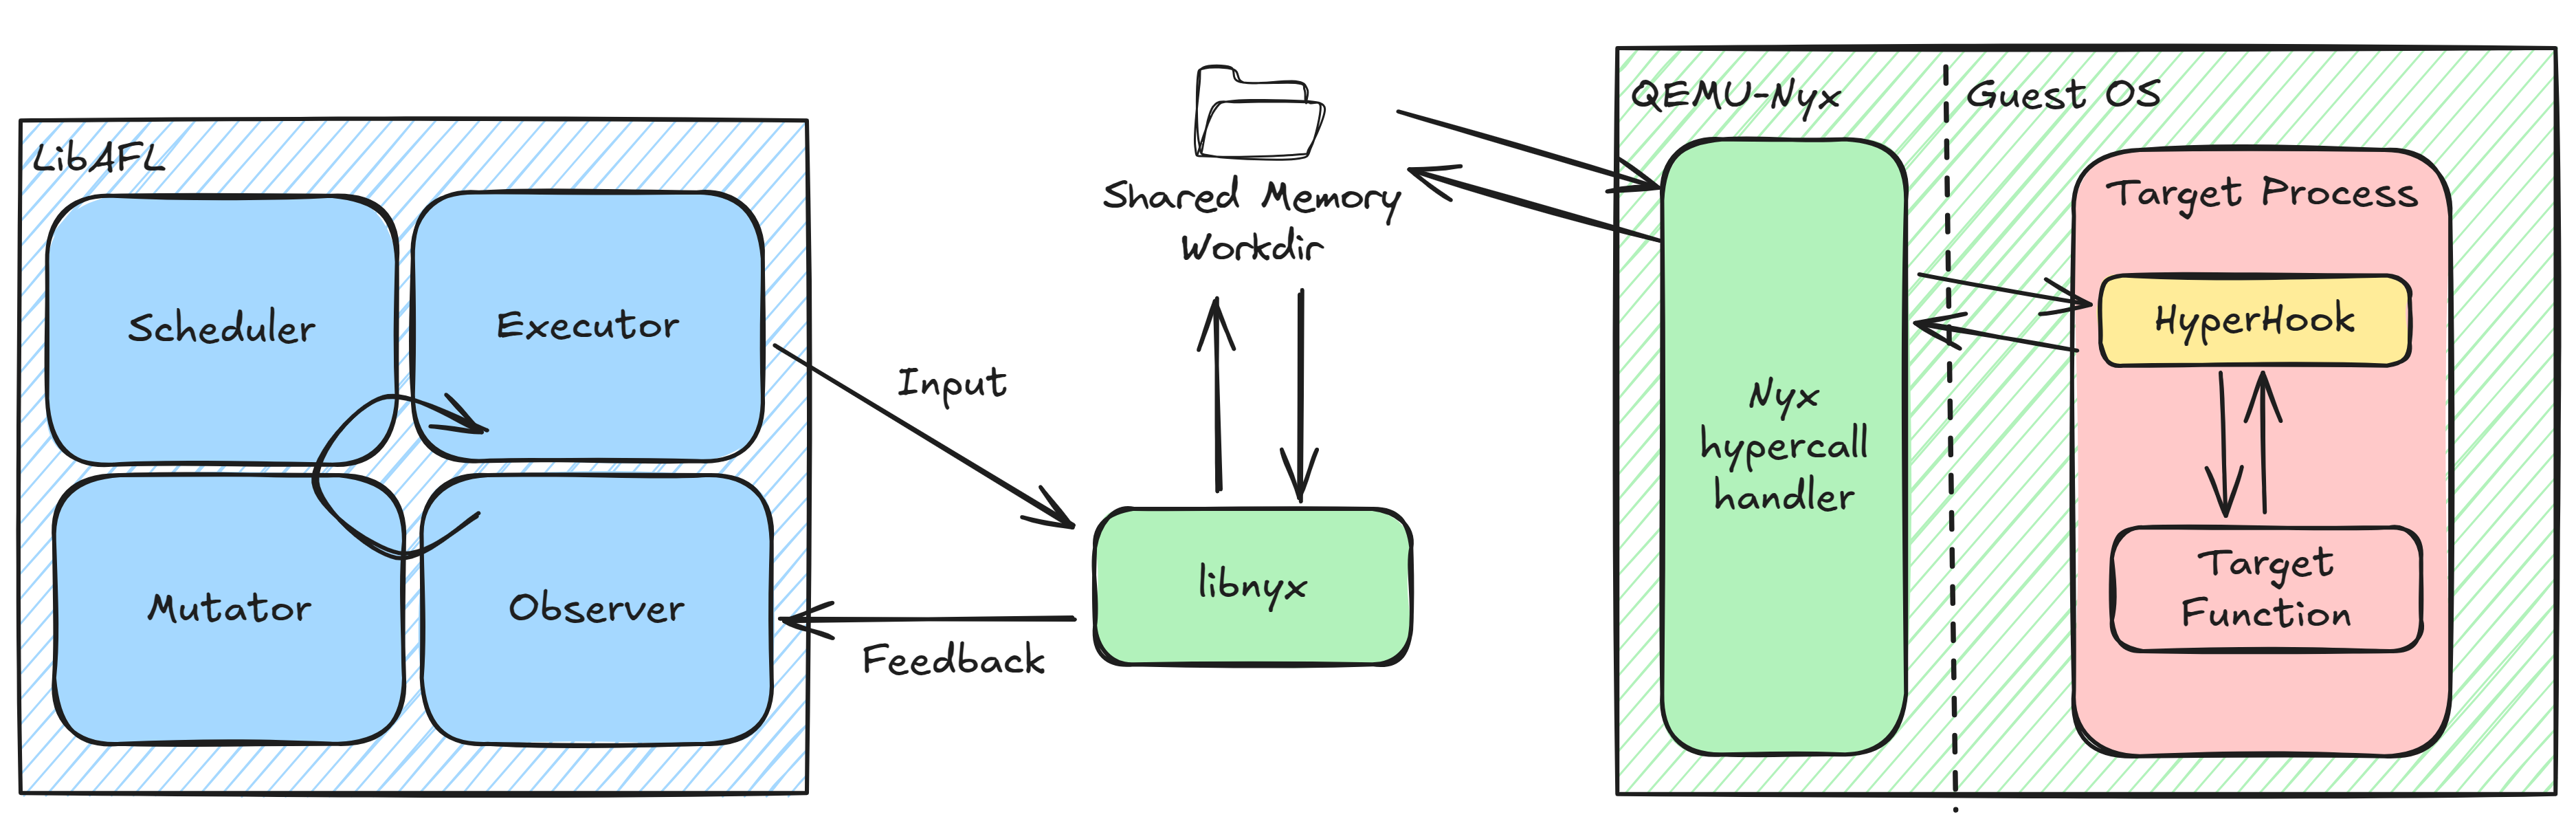
Overview of all components involved
In the following sections, we will explain each component in more detail.
Nyx
Nyx uses a modified version of QEMU, QEMU-Nyx, and a modified version of the KVM hypervisor, KVM-Nyx, to create and reset VM snapshots. The modified version of KVM enables Intel Processor Trace (PT) in nested virtualization, a hardware tracing feature that records a program’s execution flow, providing coverage information with only a relatively small overhead.
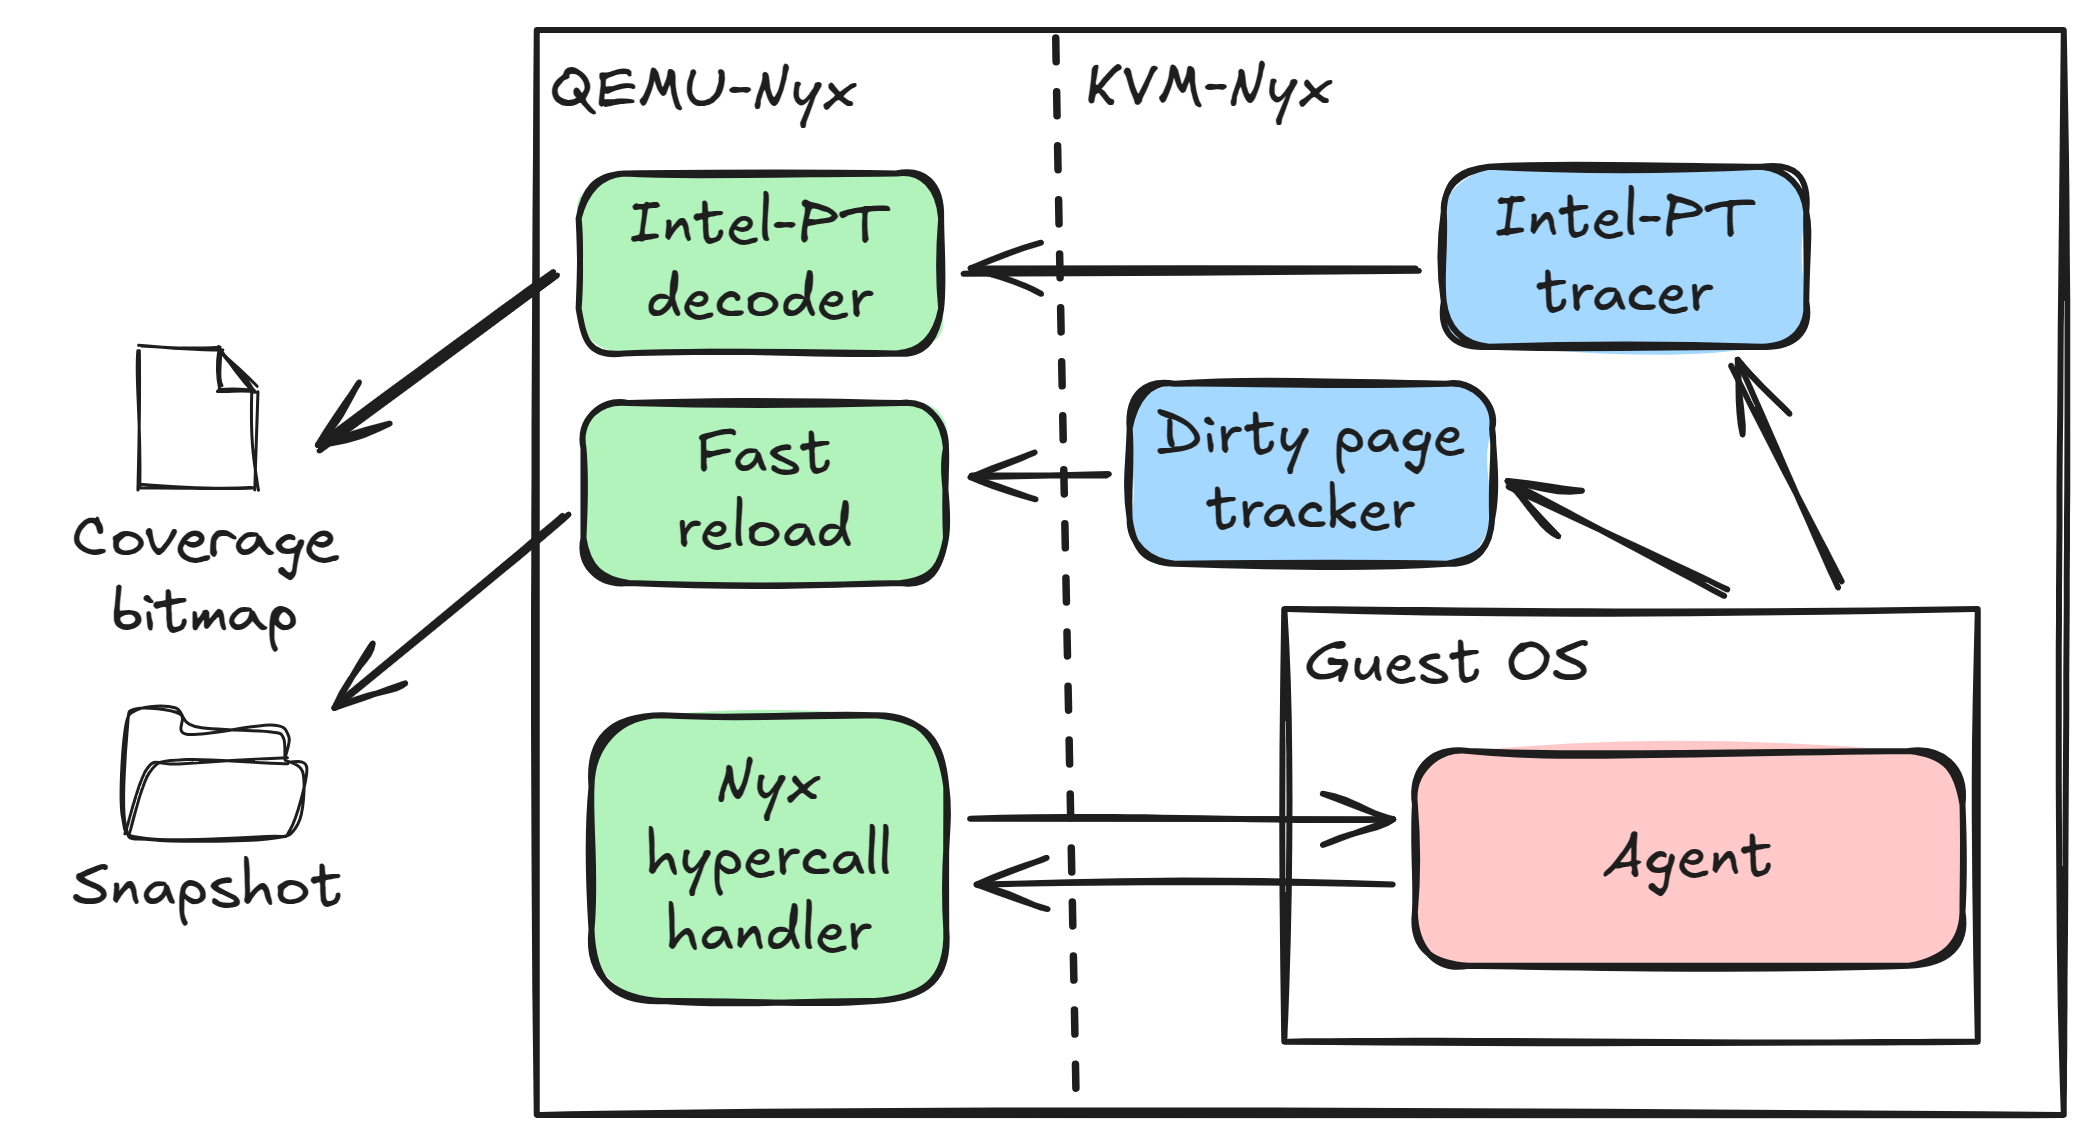
Simplified overview of NYX’s architecture
It introduces a set of custom hypercalls for guest-to-host communication between the guest OS and QEMU-Nyx. These hypercalls allow the guest to signal the host when the target reaches the fuzz entry point to take a snapshot or, for example, specify where to place the fuzz input.
To facilitate this process, the guest must run an agent responsible for both guest-to-host communication as well as harnessing the fuzz target. This is where HyperHook comes into play.
kAFL, which uses Nyx as a backend, provides detailed documentation that describes the concepts, the Nyx hypercall API, and the setup for both kernel and user-space targets on Windows and Linux. If you are interested, we’d recommend to check it out. However, we will cover everything necessary to follow along with the example setup described later in this post.
LibAFL
LibAFL is a fuzzing library that provides modular components for building specialized fuzzers. It supports Nyx as an execution engine and allows to combine with other advanced components for input generation, input scheduling, and feedback collection.
To use LibAFL, you can either assemble your own fuzzer to meet your specific needs or use one of the many existing ready-to-use example fuzzers.
While working on HyperHook, we contributed the ready-to-use nyx_launcher fuzzer, allowing you to leverage all the state-of-the-art fuzzing components of LibAFL without needing to build the fuzzer yourself.
nyx_launcher uses Nyx as the execution engine and implements several options that can be passed as command line arguments, e.g. to reproduce/replay individual fuzz inputs or to enable/disable features such as Redqueen/Cmplog.
HyperHook
HyperHook is a cross-platform harnessing framework designed for Nyx-based fuzzers. It provides essential functionalities such as issuing hypercalls, managing function hooks and detours, setting up resident memory pages, and enabling custom signal and exception handlers.
When implementing an agent with HyperHook, the agent can be compiled as a shared library (.dll or .so) to be injected or loaded into the target process.
Currently, it supports user-space targets on both Linux and Windows.
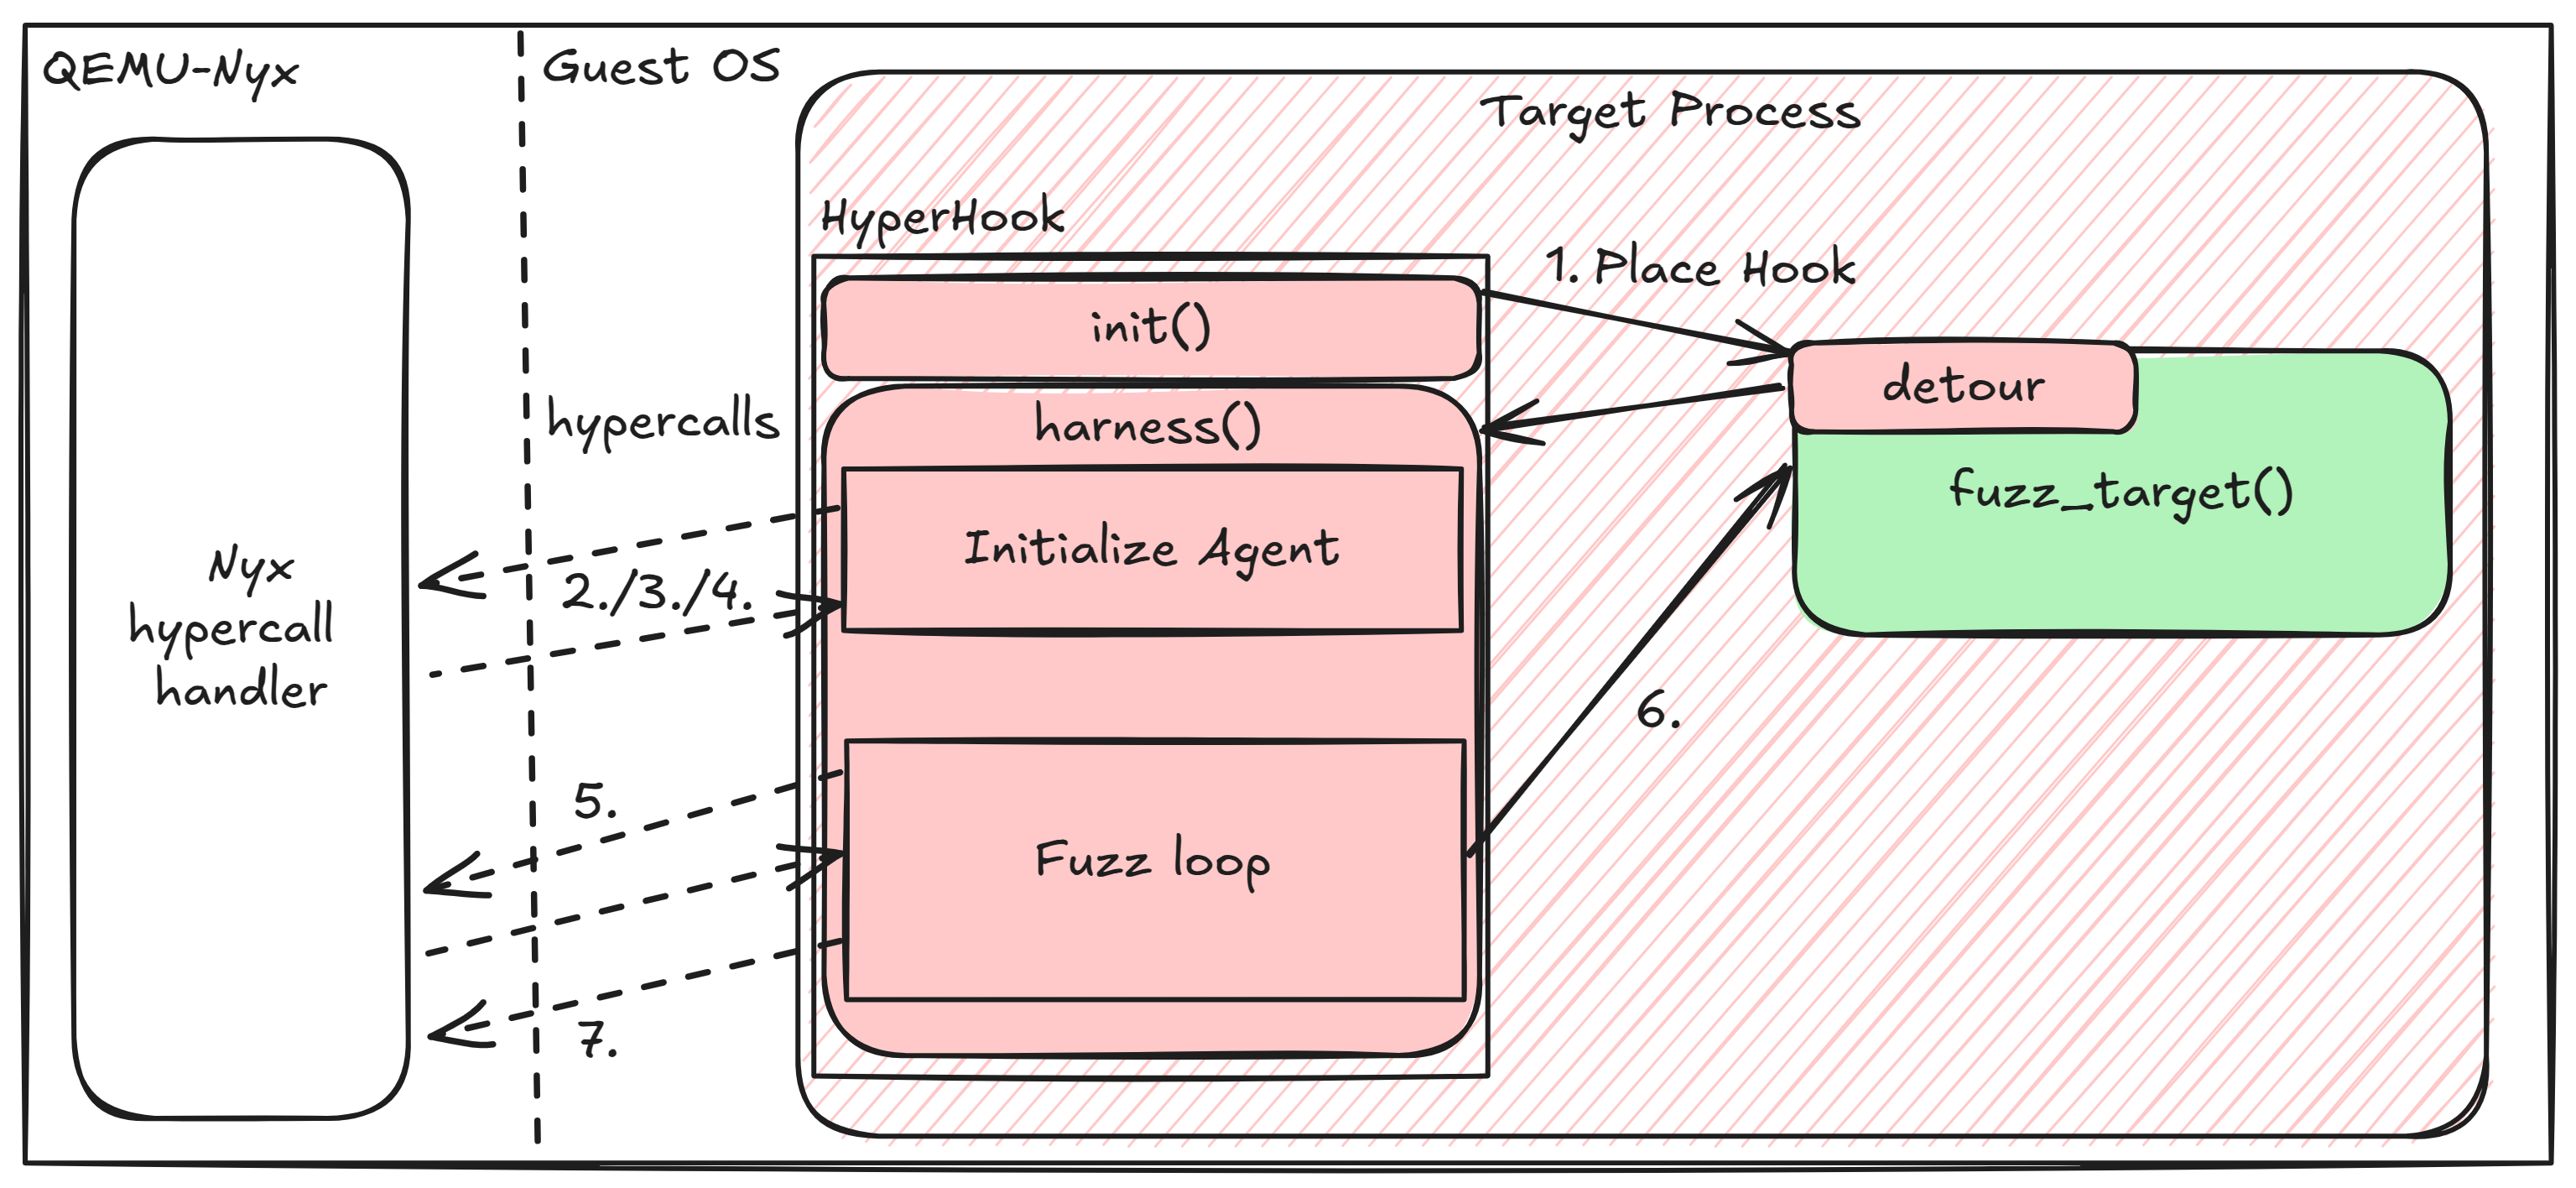
Simplified workflow of a Nyx agent
The basic workflow of an agent is as follows:
-
Hook the target function Inject a detour that calls a harness function instead of the target function.
-
Initialize the agent Perform a handshake with the host and send agent-specific configurations.
-
Register signal or exception handlers Set up handlers to catch and report crashes.
-
Setup an input buffer for fuzz input Allocate resident memory pages and inform Nyx about the memory region for the fuzz input.
-
Get fuzz input Tell Nyx to place the input (Nyx will take a snapshot before placing the first input).
-
Call the target function Trigger the execution of the target function with the fuzz input.
-
Signal the end of a fuzz case Instruct Nyx to restore the snapshot for the next iteration.
Injection Methods
A library can be either injected at runtime by interacting with a running process or preloaded into a program’s address space before it starts. Dynamic injection is commonly used for Windows, often by EDRs or anti-cheat engines, whereas preloading is primarily used for Linux. Another option is to patch the PLT (Procedure Linkage Table) on Linux or the IAT (Import Address Table) on Windows to automatically load the library during program startup.
The choice of technique depends on your target application. For example, if the function you want to target is executed only once during an early stage, preloading the library may be the best approach. On the other hand, if your target function is part of a dynamically loaded library itself, you might need to wait until the target library is loaded and inject your library afterward.
Linux
Preloading libraries on Linux is straightforward, as the dynamic linker allows specifying libraries to preload via the LD_PRELOAD environment variable:
LD_PRELOAD=/path/to/harness.so ./targetIn most scenarios, this is the preferred method.
However, if you need to inject the library at runtime, you can refer to a blog post, which explains how to use ptrace for this purpose.
Windows
On Windows, there are numerous tools and methods to inject DLLs into running processes, but few options for preloading libraries.
To inject a DLL at runtime, you can use UI tools like Process Hacker or one of many public CLI implementations.
If your target requires a method similar to preloading, you can start a suspended process with a debugger and inject the library at that stage.
Also, there are some CLI tools that implement a LD_PRELOAD equivalent for Windows.
Example Usage
Setting everything up can be challenging, as it involves multiple components, some of which are not well-documented. We encountered particular difficulties when working with a full system snapshot instead of simply booting a Linux kernel.
In the following sections, we will guide you through the setup for two examples:
- Fuzzing a Linux user-space application
- Fuzzing a Windows user-space application
Preparation
To follow along, you will need an Intel CPU that supports Intel Processor Trace (Intel-PT) — Skylake or later — and a modified Linux kernel containing the Nyx-KVM patches. Check out the kAFL installation documentation for instructions on setting up your environment.
Additionally, you will need to download LibAFL and HyperHook:
git clone https://github.com/AFLplusplus/LibAFL.gitgit clone https://github.com/neodyme-labs/hyperhook.gitFor this demo, we will use the ready to use nyx_launcher fuzzer we added to LibAFL.
It’s very similar to the qemu_launcher implementation and supports similar features.
Binary fuzzer using NYXUsage: nyx_launcher [OPTIONS] --input <INPUT> --output <OUTPUT> --share <SHARE> --buffer-size <BUFFER_SIZE>Options: -i, --input <INPUT> Input directory -o, --output <OUTPUT> Output directory -s, --share <SHARE> Shared directory -b, --buffer-size <BUFFER_SIZE> Input buffer size -x, --tokens <TOKENS> Tokens file --log <LOG> Log file --timeout <TIMEOUT> Timeout in milli-seconds [default: 1000] --port <PORT> Broker port [default: 1337] --cores <CORES> Cpu cores to use [default: all] --cmplog-cores <CMPLOG_CORES> Cpu cores to use for CmpLog -v, --verbose Enable output from the fuzzer clients --tui Enable AFL++ style output --iterations <ITERATIONS> Maximum numer of iterations -r <RERUN_INPUT> An input to rerun, instead of starting to fuzz. Will ignore all other settings apart from -d. -h, --help Print help (see a summary with '-h')To set up both the fuzzer and Nyx, we just need to build the nyx_launcher fuzzer:
cd LibAFL/fuzzers/full_system/nyx_launchercargo build --releaseThis will also build LibAFL/libafl_nyx, which clones and builds QEMU-Nyx and packer.
Fuzzing a Linux User-space Application
Here’s an example of using HyperHook to fuzz a simple Linux user-space application. Nyx supports 2 different running modes: kernel and snapshot mode. In this case, we will use the kernel mode, which boots a Linux kernel and an initramfs to load and execute our fuzz target.
Fuzz Target
For this example, we will use a simple C function that takes a char buffer and the input length as arguments.
If the input starts with the string NE0DyME, the target will crash.
This function will serve as our fuzz target for testing.
#include <stdio.h>#include <stdlib.h>
int fuzz_case(char* data, int len) {    if(data[0] == 'N') {        if(data[1] == 'E') {            if(data[2] == '0') {                if(data[3] == 'D') {                    if(data[4] == 'y') {                        if(data[5] == 'M') {                            if(data[6] == 'E') {                                int* myPTR = NULL;                                *myPTR = 0x13371338;                            }                        }                    }                }            }        }    }    return 0;}
int main() {   printf("Program startup\n");
   char* buf_input = (char*)malloc(0x1000);   fuzz_case(buf_input, 0x10);
   return 0;}
For this example, we will build the target using symbols to simplify the hooking:
gcc -g to_fuzz.c -o to_fuzzHarnessing
In this section, we will use HyperHook to implement the agent workflow we briefly described above.
In this example, we use LD_PRELOAD to preload our harness into the target process.
Libraries that are preloaded in this way are loaded before the program itself.
At this point, we can’t simply hook main or fuzz_case, as those symbols haven’t been loaded yet.
Therefore, we use redhook to hook __libc_start_main and replace it with our own implementation:
hook! {    unsafe fn __libc_start_main(        main: usize,        argc: libc::c_int,        argv: *const *const libc::c_char,        init: usize,        fini: usize,        rtld_fini: usize,        stack_end: *const libc::c_void    ) -> libc::c_int => my_libc_start_main {
        // Search for the symbol fuzz_case in the main module        let fuzz_case_addr = modules::get_symbol_address("", "fuzz_case").expect("Failed to get symbol address");
        unsafe {            // Get mutex on global hook manager            let mut hook_manager = hooking::HOOK_MANAGER.lock().unwrap();
            // Add a new hook/detour for fuzz_case            hook_manager.add_raw_detour(                "fuzz_case",                // Symbol address                (fuzz_case_addr) as *const (),                // Detour function                fuzz_case_detour as *const (),            );
            // Enable detour for fuzz_case            hook_manager.enable_detour("fuzz_case");        }        // Call original __libc_start_main function to start main()        let exit_code = real!(__libc_start_main)(main as *const () as usize, argc, argv, init, fini, rtld_fini, stack_end);        return exit_code;    }}
This injects a detour to our fuzz_case_detour function, which will be executed instead of the target function fuzz_case.
In fuzz_case_detour, we can now implement our harness logic:
// Type definition for fuzz_casetype FuzzCase = extern "C" fn(usize, i32) -> i32;static PAYLOAD: OnceLock<usize> = OnceLock::new();
extern "C" fn fuzz_case_detour(_p_data: usize, _len: i32) -> i32 {    // Generates pre-snapshot if run with ./qemu_tool.sh create_snapshot. Ignored otherwise.    nyx::lock();
    // Agent initialization:    //  - Performs initial handshake with the Nyx host    //  - Sets up panic handler    //  - Setup NyxLogger to use hprintf (printf to the Nyx host)    //  - ...    nyx::agent_init(true);
    // Register default sighandlers to catch crashes    // The default signalhandler:    //  - Sends a PANIC hypercall to the host    //  - Nyx restores the snapshot (see nyx::release() below)    misc::register_sighandlers_default();
    // Get mutex on global hook manager    let hook_manager = hooking::HOOK_MANAGER.lock().unwrap();
    // Get address ranges for the base module to setup the IP filter for PT tracing    misc::setup_pt_ranges(vec!["".to_string()]);
    // Get trampoline to original fuzz_case function    let orig_fn: FuzzCase = unsafe {        mem::transmute(            hook_manager                .get_trampoline("fuzz_case")                .expect("Failed to get trampoline"),        )    };
    // Allocate resident memory    let pages = misc::malloc_resident_pages(256).expect("Failed allocating memory");    let payload = PAYLOAD.get_or_init(|| pages);
    // Tell Nyx where to put the payload. (Does not get payload)    nyx::get_payload(*payload);
    // Fuzzing loop starts here...
    // Trigger write of payload/input    // The first call to next_payload also tells Nyx to take a snapshot    nyx::next_payload();                            // <--------------------------------                                                                            //          |    // Enable feedback collection                                           //          |    nyx::user_acquire();                                                    //          |                                                                            //          |    // Get payload from raw pointer                                         //          |    let kafl_payload = unsafe { nyx::KAFLPayload::from_raw(payload) };      //          | Snapshot                                                                            //          | restored    // Call original fuzz_case function with fuzz input                     //          | by Nyx    orig_fn(kafl_payload.data as usize, kafl_payload.size as i32);          //          |    // If orig_fn does not return nor crashes,                              //          |    // the fuzz case will timeout and the snapshot will be restored         //          |                                                                            //          |    // Disable feedback collection, signal end of fuzz case                 //          |    nyx::release();                                 // ---------------------------------    // Done!    // The function will never return as the snapshot is restored before    0}
That’s it from the harness side. We now have our fuzz target and harness library ready to go.
Configure Nyx
So, let’s set up the shared directory that Nyx requires to launch the target:
python3 LibAFL/libafl_nyx/packer/packer/nyx_packer.py \    to_fuzz \    /tmp/nyx \    afl \    processor_trace \    --fast_reload_mode \    --purge
python3 LibAFL/libafl_nyx/packer/packer/nyx_config_gen.py /tmp/nyx/ Kernel
The /tmp/nyx shared folder should now contain the following files (ignore the _no_pt files):
$ ls /tmp/nyx/# Nyx configurationconfig.ron# Script that gets executed after bootfuzz.sh# Helper tools for guest to host communicationhaborthcathget# Dependencies of to_fuzzld-linux-x86-64.so.2libc.so.6# Nyx agent/harness libraryld_preload_fuzz.so# Targetto_fuzzNow, replace the Nyx harness library with our custom harness:
cp hyperhook/target/x86_64-unknown-linux-gnu/release/examples/libfuzz_example_unix.so /tmp/nyx/ld_preload_fuzz.so
# Copy additonal dependency of the target applicationcp /lib/x86_64-linux-gnu/libgcc_s.so.1 /tmp/nyx/
Finally, replace /tmp/nyx/fuzz.sh with the following:
chmod +x hgetcp hget /tmp/cd /tmp/echo 0 > /proc/sys/kernel/randomize_va_spaceecho 0 > /proc/sys/kernel/printk./hget hcat hcat./hget habort habortchmod +x hcatchmod +x habort./hget ld_preload_fuzz.so ld_preload_fuzz.sochmod +x ld_preload_fuzz.soecho "Let's get our dependencies..." | ./hcat./hget ld-linux-x86-64.so.2 ld-linux-x86-64.so.2./hget libc.so.6 libc.so.6./hget libgcc_s.so.1 libgcc_s.so.1echo "Let's get our target executable..." | ./hcat./hget to_fuzz target_executablechmod +x target_executablechmod +x ld-linux-x86-64.so.2LD_LIBRARY_PATH=/tmp/:$LD_LIBRARY_PATH LD_PRELOAD=/tmp/ld_preload_fuzz.so ./target_executableFuzz
Now that everything is set up, we can finally run our fuzzer:
cd LibAFL/fuzzers/full_system/nyx_launchercargo run --release -- --input input/ --output output/ --share /tmp/nyx/ --buffer-size 4096 --cores all --cmplog-cores 1 --tuiIn the video, you can see the AFL++-style TUI provided by LibAFL. It displays the current execution speed across all cores (top left), client-specific metrics per core, and a graphical visualization of execution speed, number of objectives, and corpus size over time.
For this small target, the setup achieves approximately 7,200 executions per second per core. With linear scaling across cores, this reaches around 87,000 executions per second on a 12-core system.
Fuzzing a Windows User-space Application
For the Windows user-space application, we need additional preparation, as we first have to set up a Windows VM. Once the VM is set up, we can use QEMU-Nyx to boot the VM, start the target application, and create a “pre-snapshot” of the system once the target is loaded. The pre-snapshot is required to run Nyx in snapshot mode.
Selffuzz
For simplicity, we will use HyperHook’s selffuzz implementation in this example. This way, we don’t have to worry about process injection to place our hooks.
The fuzz target is quite similar to the previous example.
#include <stdio.h>#include <stdlib.h>#include <stdint.h>

__declspec( dllexport ) int fuzz_case(char* data, int len) {    if(len < 7) return -1;        if(data[0] == 'N') {            if(data[1] == 'E') {                if(data[2] == '0') {                    if(data[3] == 'D') {                        if(data[4] == 'y') {                            if(data[5] == 'M') {                                if(data[6] == 'E') {                                *((uint32_t*)0x00) = 0x13371338;                                }                            }                        }                    }                }            }        }        return 0;}
We export the function using __declspec(dllexport), so it can be called as extern "C" from Rust:
#[link(name = "fuzz_case", kind = "static")]extern "C" {    fn fuzz_case(data: *const u8, len: i32) -> i32;}
fn main() {    // Search for the symbol fuzz_case in the main module    let to_fuzz_addr =        modules::get_symbol_address("", "fuzz_case").expect("Failed to get symbol address");
    // Place hook to fuzz_case    unsafe {        // Get mutex on global hook manager        let mut hook_manager = hooking::HOOK_MANAGER.lock().unwrap();        // Add a new hook/detour for fuzz_case        hook_manager.add_raw_detour(            "fuzz_case",            (to_fuzz_addr) as *const (),            fuzz_case_detour as *const (),        );        // Enable detour for fuzz_case        hook_manager.enable_detour("fuzz_case");    }
    // Call fuzz_case to trigger hook    unsafe { fuzz_case(0 as *const u8, 0) };}
In our main function, we first place a hook and then call fuzz_case to trigger the hook.
The harnessing logic is the same as in the previous example and is implemented in fuzz_case_detour.
Refer to the repository for the complete selffuzz implementation.
To build selffuzz for windows, go to hyperhook/examples/selffuzz and run:
RUSTFLAGS='-C target-feature=+crt-static' cargo build --target x86_64-pc-windows-gnuWindows VM
To prepare the VM, I highly recommend using kAFL’s Windows template. You can follow the Windows VM Template guide to build and import the VM.
To setup the target, use the Windows Target Example:
# Make target directorymkdir -p kafl/examples/windows_x86_64/bin/userspace
# Copy the target applicationcp hyperhook/examples/selffuzz/target/x86_64-pc-windows-gnu/debug/selffuzz.exe kafl/examples/windows_x86_64/bin/userspace/selffuzz.exe
# Run ansible to prepare VM imagecd kafl/examples/windows_x86_64make provision_userspace
Pre-Snapshot/ Configuration
To generate a pre-snapshot, we use the helper script qemu_tool.sh included with the packer.
This script boots the VM and runs until the host receives a LOCK hypercall from the agent (HyperHook).
The Ansible setup of the Windows Target Example automatically adds selffuzz.exe to autostart.
Alternatively, you can manually start the target by attaching via VNC and launching it yourself.
LibAFL/libafl_nyx/packer/qemu_tool.sh create_snapshot /var/lib/libvirt/images/windows_x86_64_vagrant-kafl-windows.img 4096 /tmp/selffuzz_windows/snapshot/To generate a Nyx configuration, place the following content into LibAFL/libafl_nyx/packer/packer/nyx.ini:
[Packer]agents-folder = ./nyx-interpreter-folder = ./interpreter/qemu-pt_path = ../../QEMU-Nyx/x86_64-softmmu/qemu-system-x86_64kernel = ../linux_initramfs/bzImage-linux-4.15-rc7init_ramfs = ../linux_initramfs/init.cpio.gzdefault_fuzzer_config_folder = ./fuzzer_configs/default_vm_hda = /var/lib/libvirt/images/windows_x86_64_vagrant-kafl-windows.imgdefault_vm_presnapshot = /tmp/selffuzz_windows/Run nyx_config_gen.py for snapshot mode:
python3 LibAFL/libafl_nyx/packer/nyx_config_gen.py /tmp/selffuzz_windows/ SnapshotThis generates the /tmp/selffuzz_windows/config.ron and ./fuzzer_configs/default_config_vm.ron configuration files.
Make sure to set the mem_limit value in /tmp/selffuzz_windows/config.ron to the value used with qemu_tool.sh, in this case 4096.
Fuzz
With the configuration and pre-snapshot in place, we can now run our fuzzer:
cargo run --release -- --input input/ --output output/ --share /tmp/selffuzz_windows/ --buffer-size 4096 --cores all --cmplog-cores 1 --tuiThis full-system example achieves up to 4,800 executions/second per core and 51,000 executions/second across all 12 cores.
Conclusion
HyperHook is designed to make snapshot fuzzing more accessible and efficient by simplifying agent and harness development. By combining HyperHook with Nyx and LibAFL, you can create powerful fuzzers to uncover vulnerabilities in userspace applications.
Now that we have this setup, we will explore targets that are difficult to fuzz with existing ready-to-use fuzzers to further evaluate this approach. Make sure to check back on our blog later to see how it went!
We encourage you to try HyperHook and share your feedback.