~18 min read
Republished:
Reversing a Fingerprint Reader Protocol

TL;DR
The sensor uses TLS-PSK over USB. We overwrite the PSK and are able to read images.
Scan of not-my-finger.
I recently got a new Laptop (Lenovo Ideapad 5 - 15are05). Linux compatibility is quite good, as documented in the Arch Wiki. One part that is not working is the fingerprint reader.
In this blog post I describe my approach to reverse engineering the fingerprint reader’s windows driver and USB protocol.
This results in a python script, capable of streaming images from the sensor at around 15 FPS. Fingerprint recognition, as implemented by for example libfprint, is not available yet. More recently, a Discord community was formed, with the goal to support all kinds of Goodix devices in libfprint.
All code can be found in my GitHub Repository tlambertz/goodix-fingerprint-reversing.
Getting an overview of the device.
The first step is figuring out what sensor I have. It is USB based, as lsusb shows:
Bus 003 Device 005: ID 27c6:55a2 Shenzhen Goodix Technology Co.,Ltd. Goodix FingerPrint DeviceA Goodix sensor with the device id 27c6:55a2. As the main driver for fingerprint scanner support on Linux is libfprint, I check there first. Unfortunately, my device is listed on the Unsupported Devices List. There is not much other information about this specific product id to be found online.
I later found a very helpful libfprint issue for a similar device, but only once I had some more keywords to google. @jjjollyjim had already done very similar work, but did not publish his implementation of the protocol. He did however publish a partial wireshark dissector, which came in handy.
Logging USB traffic
We know that the reader works with Windows, which therefore has to provide a valid driver for the device. This will be very helpful, as we have an ‘easy’ target to reverse engineer. All we need to do is to reproduce what the Windows driver does in Linux. My first hope was that the protocol is simple, so that a basic driver can be implemented just by examining and replaying USB traffic.
To investigate this, we will observe the interactions between driver and device. One way to do that is using a Windows VM, running with virt-manager on my Linux host. The Goodix USB device is passed through to the VM. This allows me to capture all of the USB traffic in Linux, even early startup packets, with wireshark and the usbmon kernel module.
The kernel module has to be loaded manually with sudo modprobe usbmon. Each USB bus provides a separate capture device, so wireshark lists multiple (usbmon0, usbmon1, usbmonX). To choose the correct one, look at the bus in the lsusb output. In my case I choose usbmon3.
We see a lot of data going to and from the device, wrapped in USB_BULK packets. These seem to contain a custom goodix protocol.
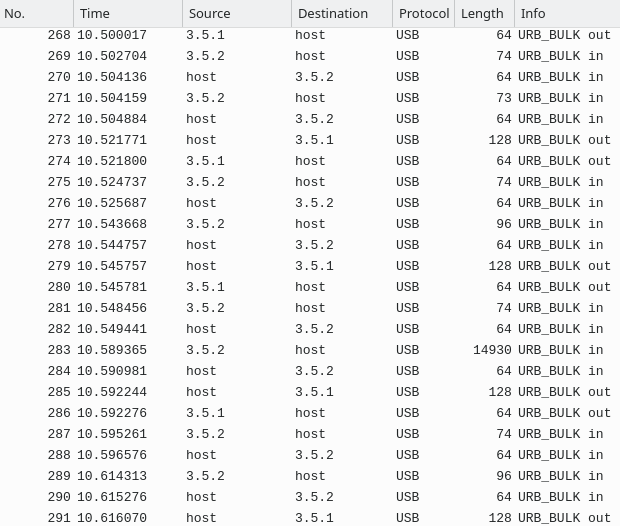
First Wireshark Capture.
Clicking through the packets, we see some plaintext strings: GF3206_RTSEC_APP_10056, This is the description string, MILAN_RTSEC_IAP_10027, Client_identity.
By googling these strings, I found a List of Fingerprint Sensor Products, which lists my device as (2015) GF3206: 54x176 pixels @500dpi, but nothing more.
The first thing I wanted to see, was whether I was able to extract the raw image from the USB capture. If this is possible, the driver is likely quite simple.
Most packets are too small (< 128 bytes) to contain relevant image data. The only bigger packets are exactly 14930 bytes, and are only sent when windows scans a finger. As such they likely contain the wanted image. But looking at their content and entropy, they seem to be entirely random. This means they are either compressed or encrypted. In cases like these, I like to use Cyberchef’s magic function, which tries common encodings and compressions automatically. It did not cook up anything useful, though.
The next step is taking a closer look at the driver. As it has to be capable of receiving the image, we ‘simply’ have to find the relevant code there and understand what it does.
Windows Driver
Windows has two different kinds of drivers. Some run in the kernel, some in userspace (see Windows: User mode and kernel mode). Goodix uses a user mode driver. This is good for us, as debugging a kernel driver would have been really annoying.
Finding the driver
To get information about the exact driver used by windows, we use the device manager.
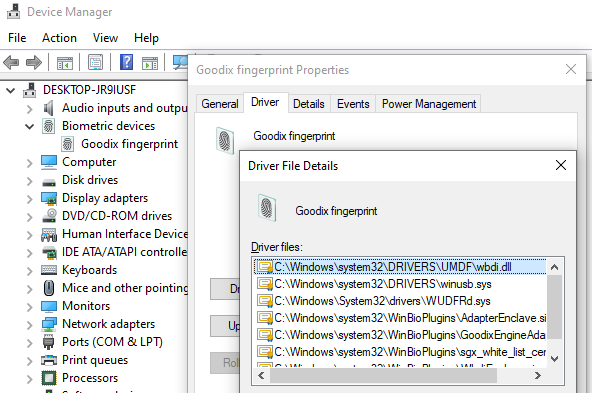
Device Manager / Goodix / Driver Details.
We get a list of many files, not all of them are in use though. I briefly opened some of them with Ghidra, and was surprised that many were similar to each other, just different implementations of the same protocol. As it turns out, this is for compatibility with different host features, like Intel SGX. In my case wbdi.dll contains the code that is actually used for my device.
WUDFRd.sys is the User-mode Driver Framework Reflector, a generic kernel driver used for user-mode drivers, so not specifically relevant here.
I also used Everything (an incredibly fast full-disk file search tool I cannot recommend enough!) to search for Goodix. This revealed a folder with some logs:
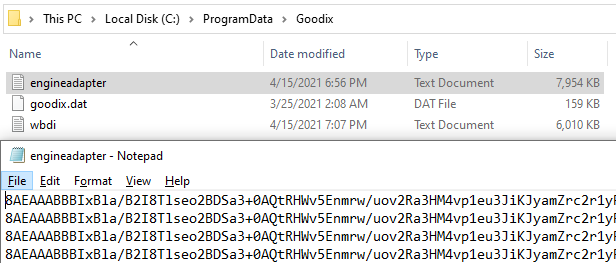
Goodix Folder, containing logs. Logs contain lots of encrypted and base64 encoded data.
I then looked for processes which have one of these dll’s loaded (for example by running tasklist /M GoodixEngineAdapter.dll). This turned out to be svchost.
I also ran Procmon and filtered by goodix. This showed lots of reads and writes to the goodix logfiles by svchost.
Unfortunately, this was a false lead. The service does actually do some goodix-stuff, but not the low-level device communication I had expected. As I learned, this is instead done via the Usermode Driver Framework in WUDFHost.exe.
Another way of finding all relevant driver files.
As it turns out, Windows stores device drivers in separate folders in a Driver File Repository. By sorting the FileRepository folder by modification date, we can quickly find newly installed drivers. This has the advantage that all files that belong to the driver are in one place.
In my case, we can find the goodix driver in C:\Windows\System32\DriverStore\FileRepository\wbdiusb.inf_amd64_d9f7089f2e88d175:
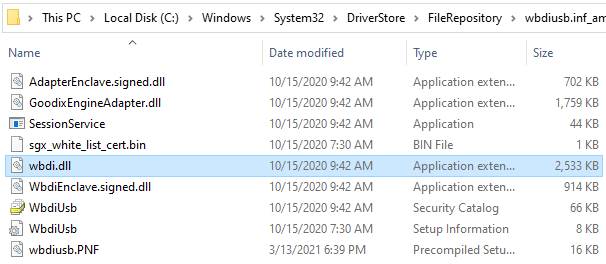
All Goodix driver files.
Usermode Driver Framework (UMDF)
To understand how usermode drivers work, I found it helpful to read up on how to build one: How to write your first USB client driver (UMDF). As this post is already quite long, I will only briefly summarize the important parts here. Take a look at the following picture:
All Goodix driver files.
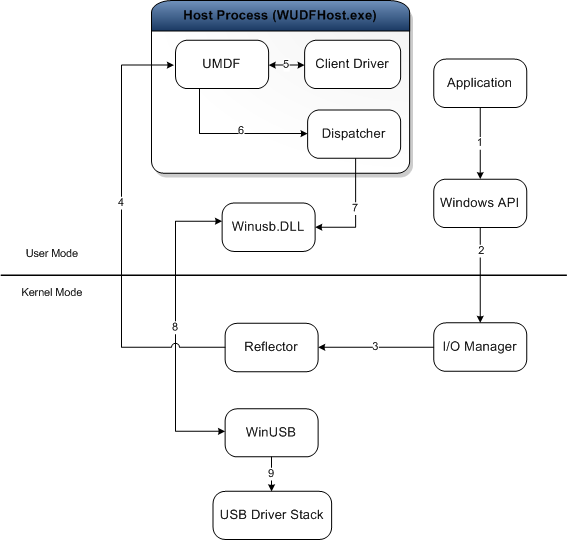
Usermode Driver Framework (UMDF). Microsoft Documentation, CC BY 4.0
- When an
Applicationwants to talk to a device, it issues a request to the Kernel via theWindows API(1) - Kernel redirects request into
WUDFHost.exe(2-4) - UMDF talks to the
Client Driver. This is the actual “custom part”, which the vendor implements. (5) - The driver processes request, creates some responses to send to the device, hands them off to UMDF again
- Actual device interaction happens through
Winusb.DLLand the kernel (6-9)
For us this means that we can debug the WUDFHost.exe process, and capture all relevant parts of the driver-device data parsing!
Debugging the Driver
To debug the driver I use the excellent x64dbg. My first goal was getting a rough overview what is happening. As we already know the driver writes quite a lot of encrypted logs, this was my first target. Finding the logging function in Ghidra is trivial, as almost all functions log something. Creating a breakpoint here allowed me to print all arguments to all log invocations. This had some drawbacks though. First, it was too slow, and the USB connection was timing out, interrupting the normal driver flow. Second, the messages were not formatted yet.
A closer look at the log function revealed that it has the capability to log to debug via the Windows API OutputDebugStringW. This is normally runtime gated, but a simple binary patch (applied via x64dbg’s patching feature) took care of that. Now all driver log messages appear in the x64dbg log window. A full example log is included in my GitHub repo.
I have not reversed the log encryption, because dumping from the debugger directly was easier. @mpi3d managed to disable encryption by setting some registry keys, which I have not tried to reproduce yet: Issue.
As these logs are incredibly verbose, they proved immensely helpful. They revealed the rough driver flow is as expected:
- query version and firmware, set some config registers
- check if finger is on the sensor
- request an image
- image is sent back
Creating breakpoints in functions which log interesting strings allowed me to correlate usb messages to log output via timing.
An example log message looks like
[pid: 2148][tid: 6316][03-14 07:38:01.287][debug][GxlogicAlgorithm.c][IsNeedRollback :0123] >> now preoverlay: 0, maxPreoverlayRatio:100\nIt includes file, function name and line number. The availability of function names makes reversing much easier. Almost every function has log output, so it’s almost like we have symbols available.
The Protocol
The USB protocol used by the goodix sensor is packet based. All communication is initiated by the driver. It sends a command and waits for a response. Each command is ack’d by the device before sending a response.
Looking at the log we gathered before, we see a hint as to why the image has so high entropy:
Wait For Tls Handshake over.
They are using TLS over USB! TLS is not decryptable with a passive attack. We either need to setup the connection ourselves, or dump the used key. Annoyingly, the TLS setup is done when the driver is loaded, before we are able to attach to the driver to dump logs. In the next section we remidy this. But first, lets examine the non-encrypted part of the protocol a bit.
Most packets are limited in length to 128 bytes. If a response is longer, it is split into multiple packets. The first one contains the correct length, the later ones have no header at all and contain just data. This makes confident reassembly a bit more complicated.
The protocol consists of two layers. An outer wrapper, which just contains a packettype, a length and the payload, and the payload itself. The format of the payload depends on the type set in the wrapper. It most often is A0, in which case the payload is a plaintext command:
struct wrapperpacket {  uint8 packettype;  uint16 length;       // length of payload without this header  uint8 header_chksum; // sum of three previous bytes  uint8 payload[length];}
// Packettype A0. Normal, plaintext packet.struct normalpacket {  uint8 cmd;  uint16 length;       // length of data without this header, including the checksum at the end  uint8 data[length-1];  uint8 chksum;        // 0xaa - sum(previous bytes)}
// Packettype B0. Used during TLS handshake// Packettype B2. Used when sending TLS encrypted image data
Creating a Wireshark Disector
@jjjollyjim has published an wireshark dissector for a similar fingerprint reader, which I took as a baseline. An improved disector can be found in my repo.
There are two ways to create Wireshark disectors. They can either be compiled, or be written in Lua. While Lua does not have access to the full dissector API, it is often enough and way easier to write and iterate. I found this Guide to have some helpful pointers into writing a Lua based USB dissector.
To install a custom disector, you simply copy it into ~/.local/lib/wireshark/plugins/3.4. During development, the shortcut Strg+Shift+L, which hot-reloads all Lua scripts is immensely helpful for fast iteration.
The resulting decoded protocol looks as follows:
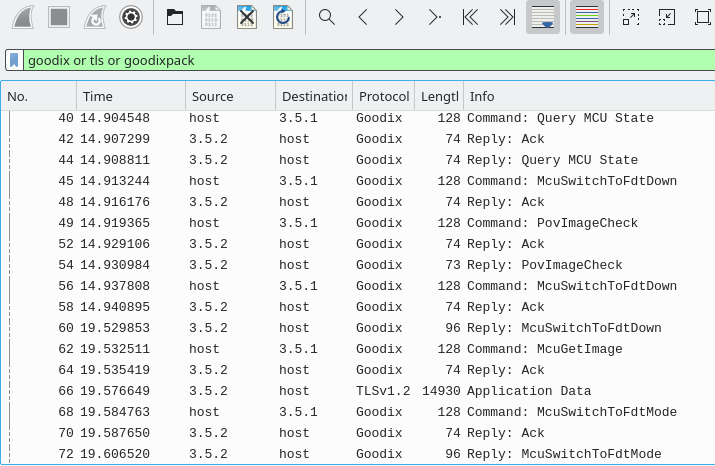
Wireshark, Overview
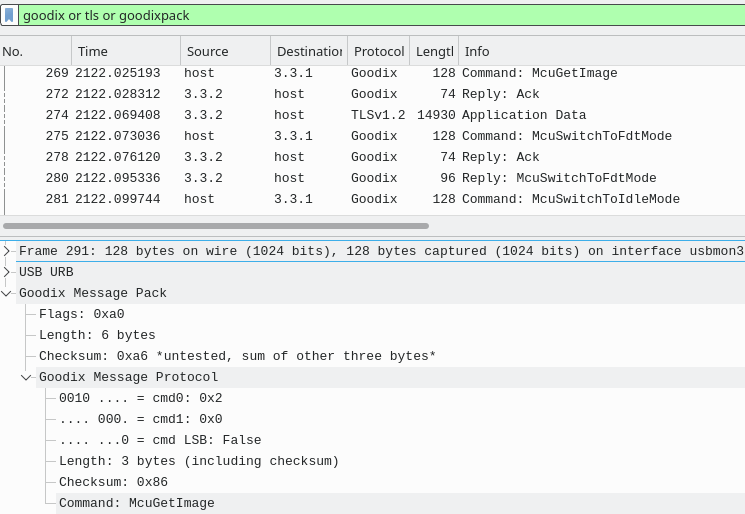
Wireshark, McuGetImage decoded
Wireshark is even able to show us information about the TLS packets. Unfortunately, it cannot decrypt TLS packets outside of a TCP stream, even if we provide the PSK. This is because TLS is stateful, and Wireshark needs to know which sequence of TLS packets belong together. But there is no API to provide this information, outside of a TCP stream, where packets are strictly ordered. As a workaround it is possible to send the data 1:1 over TCP, capture this in a separate pcap, enter the PSK key in the wireshark settings, and then decrypt it. This proved unnecessary though.
Debugging Initialization, changing the PSK
The WUDFHost process only spawns when the driver is needed, and then immediately runs the device initialization code, which makes debugging it more difficult. As this is a common problem when developing drivers, Windows provides a registry key do delay initialization until after a debugger is attached to WUDFHost (HostProcessDbgBreakOnStart, see How to Prepare for UMDF Debugging). Using windbg this works fine, but with x64dbg the process exits early after attaching. I have no idea why that happens, please let me know if you have an idea.
It seems the Goodix Devs had a similar problem, and implemented their own workaround: a debug registry key: HKEY_LOCAL_MACHINE\SOFTWARE\Goodix\FP\DebugMe. If this is set, the driver loops for a few minutes during initialization (in function initThread). This provides more than enough time to attach x64dbg. We can then use the debugger to break out of the loop. This is not the only registry key read, there are ~15. I have not looked into them yet, but one called securityReviewSwitch might we interesting to look at.
This early attach enables us to get the log output of TLS intialization, and, more importantly, it enables us to interfere with it. The log shows that they are using TLS-PSK, a version of TLS that works without certificates. Instead, it uses a mutually known pre-shared-key (PSK). To talk to the sensor we need to know this PSK! THe windows driver obviously knows it, so we should be able to get a hold of it.
In the log we find a crucial method: ProcessPsk. This is the method that checks/sets the PSK key used by the TLS connection! Lets look at a log excerpt:
ProcessPsk psk process...ProcessPsk 1.check psk if valid(total times:3)PresetPskIsValidR 1.get sgx[psk] from mcuPresetPskIsValidR 2.unseal sgx[psk] & cal the local_hashCalculatePmk 1.gen raw_pmkCalculatePmk 2.calculate pmkPresetPskIsValidR 3.get hmac of pmk from mcuPresetPskIsValidR 4.verify hmac of local and mcuProcessPsk psk is valid!The driver reads two values from the sensor (mcu). First, an encrypted PSK. Contrary to the log messages, it is NOT sealed in an SGX enclave, but rather encrypted with windows’s CryptProtectData. This encrypts data to the currently logged in user. The laptop has an AMD processor, so SGX is not available. It might very well be that on Intel SGX is used.
Secondly, the driver queries a hash of the PMK. The PMK (preshared master key) is the actual key used by TLS and is computed from the PSK. This way, the driver can verify that the decryption of the PSK was successful and both devices have the same PMK.
Now the crucial question is: How does the fingerprint sensor get the PMK in the first place? It obviously needs it, unencrypted, to be able to establish a communication. To investigate this, I spun up a clean windows VM and observed the first connection ever between the driver and the device. This revealed crucial information:
ProcessPsk psk process......PresetPskIsValidR 2.unseal sgx[psk] & cal the local_hash"GfUnsealData CryptUnprotectData failed, error: -2146893813...ProcessPsk 3.write psk to mcu(times:1)(total times:3)PresetPskWriteKey 0.generate random pskPresetPskWriteKey 1.seal psk by sgxPresetPskWriteKey 2.encrypt psk by wbPresetPskWriteKey 3.write to mcuProcessPsk 4.write psk successfully ,check againPresetPskIsValidR .....ProcessPsk psk is valid!AHA! The driver queries the encrypted PSK from the device. But it was encrypted with a different windows VM, so the CryptUnprotectData call fails! It then proceeds to generate a new, random, PSK and sends it to the device. This represents a trust-on-first-use security model. But I am not sure if there is any way for the user to detect a changed PSK if the driver just sends a new one…
Our Linux driver should be able to do the same! But it seems Goodix is really worried about an attacker sniffing packets, and wanted to prevent a passive observer to sniff the PSK. As such, the PSK is not transmitted in the clear, but encrypted with a whitebox.
Whitebox is an interesting field of cryptography. It is applied to symmetrical ciphers. That means encryption and decryption key are the same. The goal of a whitebox is to provide an encryption function to an adversary, which will NOT be able to get the key out of this box. As such, he will be unable to decrypt. This prevents passive sniffing.
But we simply want to know one valid PSK - encrypted PSK pair and can therefore use the whitebox as-is, without needing the key.
One way to do this, is to set a breakpoint in PresetPskWriteKey, and just change the PSK in memory right after it is generated and before it is encrypted.

WGhidra. Decompilation of PresetPskWriteKey
I provide an example plain-ciphertext pair for my device:
PSK = bytes.fromhex("0000000000000000000000000000000000000000000000000000000000000000")PSK_WB = bytes.fromhex("ec35ae3abb45ed3f12c4751f1e5c2cc05b3c5452e9104d9f2a3118644f37a04b6fd66b1d97cf80f1345f76c84f03ff30bb51bf308f2a9875c41e6592cd2a2f9e60809b17b5316037b69bb2fa5d4c8ac31edb3394046ec06bbdacc57da6a756c5")PMK_HASH = bytes.fromhex("81b8ff490612022a121a9449ee3aad2792f32b9f3141182cd01019945ee50361")Another way to get a valid, arbitrary PSK - PSK_WB pair is to break the whitebox, which in this case barely deserves its name. If you were able to follow up to here, I am sure you will be able to break it. This will nonetheless be left as an excercise for the reader, because Goodix might have good reasons to keep it a secret.
Some notes on reversing the TLS functions
Looking at strings contained in the binary, I fairly quickly determined that it was using the mbedtls library. This was good to know, as mbedtls has a very wide range of distinct error codes for each function. For example, -0x6380 is used in mbedtls_cipher_update, allowing to easily identify the function. This is likely something that can also be done by function signatures, but I did not need to know many functions and was to lazy to generate the signatures.
The TLS library has its own logging, which is normally runtime disabled. I found the place where it is set, and used a breakpoint to set it to trace level.
Figuring out the Image Format
By writing our own PSK to the device, we are able to establish communication and receive an image. The decrypted image has substancially less entropy, so decryption is almost guaranteed to be correct. But a simple visualization still looks like noise with no fingerprint visible. We need to figure out how the image is encoded.
From the initial research we know the sensor likely has a resolution of 54x176. To verify this, we can use the GIMP Raw Image dialog. It allows to easily modify the width and see a live result, which makes finding repeating patterns easy.
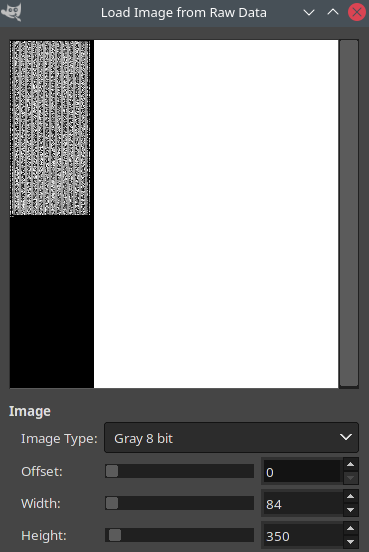
Raw decrypted fingerprint image in GIMP. Note the repeating structure in the image -> Width is 84 bytes.
We could also have done this with a simple hex editor. The received image is 14788 bytes, and we see repeating zeroes every 84 bytes. This means that the final 4 bytes are extra and likely a checksum.
The row count of 176 matches. Each contains 84 bytes, which we expect to be 54 pixels. This matches if each pixel is 12 bits in depth, as .
Figuring out how the bits are packed required further reverse engineering of the code, which revealed a quite curious method: Every four pixels are packed into 6 bytes, according to the following pattern:
6 input bytes: 01 23 45 67 89 abunpack to 0x123 0x670 0xb45 0x89aYAY! Finally a decoded image!

Empty Fingerprint image. There are some vertical lines, which are present in every image and could be calibrated for.
Creating a Python Driver PoC
I have written a first proof-of-concept driver in python: capture.py.
It connects to the device, changes the PSK to all zero if needed, sets up a TLS connection and waits for the finger to be placed on the device and requests an image. As TLS is only specced to be used via TCP, all python libraries I found expect a socket to interact with. DTLS, which is intended to be wrapped in other protocols, is slightly different and thus incompatible.
To work around this, I simply open my own socket and proxy the TLS communication through it. This also enables wireshark to sniff the interface and decrypt all traffic, which might be helpful when debugging.
As a simple TLS server I opted for the openssl included one:
openssl s_server -nocert -psk 0000000000000000000000000000000000000000000000000000000000000000 -port 4433 -quietTo plot the image I use pyplot. The maximum framerate I was able to get from the sensor was 16 FPS:
Scan of not-my-finger.
Future
For the Sensor to be actually useful (like unlocking your laptop), libfprint support is required. I have briefly looked into adding support myself, but was turned off by their use of object oriented C. There also would be the need to integrate some TLS library into libfprint. I might come back to this in the future though.
In the meantime, there is a new Discord server, where many owners of goodix devices have gathered to work on a unified driver. It seems every goodix scanner type is slightly different. As of 27/05/2021, images were extracted from 4 out of 11 models.
Feel free to join as well, if to contribute or just to lurk :)